ath: a interactive Amazon Athena shell

Webコンソールからパーティションをぽちぽち追加するのに疲れたので、Athena用のシェルを書きました。

github.com

使い方は以下のような感じです。

$ export ATH_OUTPUT_LOCATION=s3://my-bucket

$ ath

default> show databases;
default
sampledb

default> /use sampledb
sampledb> show tables;
elb_logs

sampledb> select * from elb_logs limit 3;
"request_timestamp","elb_name","request_ip","request_port","backend_ip","backend_port","request_processing_time","backend_processing_time","client_response_time","elb_response_code","backend_response_code","received_bytes","sent_bytes","request_verb","url","protocol","user_agent","ssl_cipher","ssl_protocol"
"2015-01-01T08:00:00.516940Z","elb_demo_009","240.136.98.149","25858","172.51.67.62","8888","9.99E-4","8.11E-4","0.001561","200","200","0","428","GET","https://www.example.com/articles/746","HTTP/1.1","""Mozilla/5.0 (Macintosh; Intel Mac OS X 10_11_6) AppleWebKit/602.1.50 (KHTML, like Gecko) Version/10.0 Safari/602.1.50""","DHE-RSA-AES128-SHA","TLSv1.2"
"2015-01-01T08:00:00.902953Z","elb_demo_008","244.46.184.108","27758","172.31.168.31","443","6.39E-4","0.001471","3.73E-4","200","200","0","4231","GET","https://www.example.com/jobs/688","HTTP/1.1","""Mozilla/5.0 (X11; Ubuntu; Linux x86_64; rv:15.0) Gecko/20100101 Firefox/15.0.1""","DHE-RSA-AES128-SHA","TLSv1.2"
"2015-01-01T08:00:01.206255Z","elb_demo_008","240.120.203.212","26378","172.37.170.107","8888","0.001174","4.97E-4","4.89E-4","200","200","0","2075","GET","http://www.example.com/articles/290","HTTP/1.1","""Mozilla/5.0 (Windows NT 10.0; Win64; x64) AppleWebKit/537.36 (KHTML, like Gecko) Chrome/42.0.2311.135 Safari/537.36 Edge/12.246""","-","-"

sampledb> select * from elb_logs limit 3 &
QueryExecution 2335c77b-d138-4c5d-89df-12f2781c311b

sampledb> /desc 2335c77b-d138-4c5d-89df-12f2781c311b
{
  "query_execution_id": "2335c77b-d138-4c5d-89df-12f2781c311b",
  "query": "select * from elb_logs limit 3",
  "result_configuration": {
    "output_location": "s3://sugawara-test/2335c77b-d138-4c5d-89df-12f2781c311b.csv"
  },
  "query_execution_context": {
    "database": "sampledb"
  },
  "status": {
    "state": "SUCCEEDED",
    "submission_date_time": "2017-07-02 16:29:57 +0900",
    "completion_date_time": "2017-07-02 16:29:58 +0900"
  },
  "statistics": {
    "engine_execution_time_in_millis": 719,
    "data_scanned_in_bytes": 422696
  }
}

sampledb> /result 2335c77b-d138-4c5d-89df-12f2781c311b
"request_timestamp","elb_name","request_ip","request_port","backend_ip","backend_port","request_processing_time","backend_processing_time","client_response_time","elb_response_code","backend_response_code","received_bytes","sent_bytes","request_verb","url","protocol","user_agent","ssl_cipher","ssl_protocol"
"2015-01-01T16:00:00.516940Z","elb_demo_009","242.76.140.141","18201","172.42.159.57","80","0.001448","8.46E-4","9.97E-4","302","302","0","2911","GET","https://www.example.com/articles/817","HTTP/1.1","""Mozilla/5.0 (X11; Ubuntu; Linux x86_64; rv:15.0) Gecko/20100101 Firefox/15.0.1""","DHE-RSA-AES128-SHA","TLSv1.2"
"2015-01-01T16:00:00.902953Z","elb_demo_005","246.233.91.115","1950","172.42.232.155","8888","9.59E-4","0.001703","8.93E-4","200","200","0","3027","GET","http://www.example.com/jobs/509","HTTP/1.1","""Mozilla/5.0 (Macintosh; Intel Mac OS X 10_11_6) AppleWebKit/602.1.50 (KHTML, like Gecko) Version/10.0 Safari/602.1.50""","-","-"
"2015-01-01T16:00:01.206255Z","elb_demo_002","250.96.73.238","12800","172.34.87.144","80","0.001549","9.68E-4","0.001908","200","200","0","888","GET","http://www.example.com/articles/729","HTTP/1.1","""Mozilla/5.0 (Windows NT 10.0; Win64; x64) AppleWebKit/537.36 (KHTML, like Gecko) Chrome/42.0.2311.135 Safari/537.36 Edge/12.246""","-","-"

どうぞご利用ください。

Ridgepole v0.7.0.beta2

Ridgepole v0.7.0.beta2をリリースしました。 開発中にコメントやフィードバックをしていただいた方にはありがとうございました。

github.com

主な変更点は以下の通りです。

  • Rails(ActiveRecord) 4.xのサポートを止めた
    • 5.xと両方のフォーマットをサポートする必要があったspecがだいぶきれいになりました
    • またactiverecord-mysql-awesomeの機能は5.xに取り込まれているので--enable-mysql-awesomeオプションを削除しました
  • Rails(ActiveRecord) 5.1に対応
  • Ruby 2.4のサポート…というかテストケースを追加
  • DROP TABLEをスキップする--skip-drop-tableオプションを追加
  • MySQLのテーブルオプションの差分を適用する--mysql-change-table-optionsオプションを追加
    • kamipoさんの実装をほとんどそのまま取り入れました
  • MySQL 5.7のサポート
    • JSON型とGenerated Columnsが使えるようになりました
  • URL形式の接続設定のサポート
  • 環境変数経由での接続設定の受け渡し(-c env:MY_DB_URL
  • 名無しの外部キーのサポート
  • 外部キーの適用順序の変更(FK削除→テーブル変更→FK追加)

AR 5.1サポート・MySQL 5.7サポート・FKまわりの改善が大きなところです。 特にFKまわりついては、はまる人が多いようだったので、それなりに使い勝手を良くしたつもりです。 (とはいえ、ARの名無しFKの実装についてはもやもやするところですが)

0.7系について、不具合や要望等があれば随時Issue上げていただけると助かります。

fstaidというHAデーモンを作った

fstaidというHAデーモンを作りました。

github.com

HeartbeatとかCorosyncとかPacemakerの代替を考えて作ったソフトウェアです。

なぜ作ったのか?

それほど多くはないんですがたまに「先方の許可するIPアドレスは1つしかないから、フェイルオーバー時にElasticIPを付け替える感じで」という案件がたまにあるんですよ。 そうすると「Corosync/Pacemakerでクラスタ組むか。だるいな…」ということになって、Heartbeat/Corosync/Pacemakerを使いたくない欲が高まった結果、作成されました。 KeepalivedSerfを使ってクラスタを組むこともできるんですが、どうもやりたいことに対して、オーバーキル感とか明後日の方向感がぬぐえない感じでいました。

話は変わってMHAです。 MHAいいですよね。安定した動作もレプリケーションの付け替えもすばらしいんですが

  • 監視対象外の第三者サーバによるモニタリング
  • セカンダリチェック
  • CLIツール群による設定・環境まわりのチェック
  • フェイルオーバー完了後の起動ロック

などなど、「ああ、わかってる…」感がすごく好きでした。 fstaidにはMHAにインスパイアされたこれらの設計を取り入れた(つもり)です。

サーバ構成イメージ

使い方

以下のような感じで起動します。

fstaid -config fstaid.toml

設定ファイルは以下の通り。

[global]
port = 8080
interval = 1
maxattempts = 3
#lockdir = "/tmp"
#log = "/var/log/fstaid.log"
#mode = "debug"

[handler]
command = "/usr/libexec/fstaid/handler.rb"
timeout = 300

[primary]
command = "curl -s -f server-01"
timeout = 3

[secondary]
command = "curl -s -f -x server-02:8080 server-01"
timeout = 3

[self]
command = "curl -s -f 169.254.169.254/latest/meta-data/instance-id"
timeout = 3

[[user]]
userid = "foo"
password = "bar"

動作

  1. 2〜4までを一定時間ごとに繰り返す
  2. self-checkを実行→失敗したら即終了
  3. maxattemptsまでprimary-checkを実行。すべて失敗したら4に進む
  4. secondary-checkを実行。失敗したら5に進む
  5. 監視対象を死亡と見なして、ハンドラスクリプトを実行
  6. フェイルオーバーが完了。ロックファイルを作成してfstaidは終了 (ロックファイルを削除しないと、起動できない)

self-checkの必要性が微妙な感じなんですが、今のところ

  • self-checkでsecondary-checkの踏み台サーバとの疎通を確認
  • secondary-checkで踏み台サーバ経由で監視対象の動作を確認(ssh、http proxy等々)
  • primary-checkで監視対象の動作を直接確認

とするといいんじゃないかと考えております。

ハンドラ

ハンドラはこんな感じです。

#!/usr/bin/env ruby
# The handler is called when both the primary check and the secondary check fail

primary_exit_code   =  ARGV[0].to_i
primary_timeout     = (ARGV[1] == 'true')
secondary_exit_code =  ARGV[2].to_i
secondary_timeout   = (ARGV[3] == 'true')


def failover
  # to fail over
end

if primary_exit_code != 0
  if secondary_timeout
    # Nothing to do if the secondary-check times out
    exit 1
  end

  failover
elsif primary_timeout
  # Nothing to do if the primary-check times out
  exit 2
end

Rubyで書いてますが、実行できればシェルスクリプトでもなんでも。

  • ARGV[0]: primary-checkの終了コード
  • ARGV[1]: primary-checkがタイムアウトしたか否か
  • ARGV[2]: secondary-checkの終了コード
  • ARGV[3]: secondary-checkがタイムアウトしたか否か

ここに、ElasticIPの付け替えとか、ENIの付け替えとかを仕込むとよいかと。

その他

curl localhost:8080/failをたたくことで、手動でフェイルオーバーを実行することもできます。

まとめ

今のところ、まだそのような案件が降ってきていないので、まだ実戦投入はできていないのですが、つらみが出てきそうなら積極的に使っていこうかと考えています。 あるいは、まだ知らない便利ソリューションがあるとしたら是非知りたいところですが…

pt-online-schema-change-fast-rebuild-constraints

pt-online-schema-change-fast-rebuild-constraintsというpt-oscプラグインを書きました。

これは--alter-foreign-keys-method= rebuild_constraintsを高速にするプラグインです。

通常、FKで参照されている親テーブルにpt-oscを実行しようとすると*1

pt-online-schema-change \
  --alter 'ADD num int' \
  h=localhost,u=root,D=employees,t=employees \
  --dry-run
  #--execute
$ ./pt-osc.sh
Operation, tries, wait:
  analyze_table, 10, 1
  copy_rows, 10, 0.25
  create_triggers, 10, 1
  drop_triggers, 10, 1
  swap_tables, 10, 1
  update_foreign_keys, 10, 1
Child tables:
  `employees`.`dept_emp` (approx. 331143 rows)
  `employees`.`dept_manager` (approx. 24 rows)
  `employees`.`salaries` (approx. 2838426 rows)
  `employees`.`titles` (approx. 442010 rows)
You did not specify --alter-foreign-keys-method, but there are foreign keys that reference the table. Please read the tool's documentation carefully.

こんな感じで警告が出ます。

--alter-foreign-keys-method=rebuild_constraintsをつけてexecuteしてみると

$ ./pt-osc.sh
...
2016-11-03T12:44:13 Copied rows OK.
2016-11-03T12:44:13 Swapping tables...
2016-11-03T12:44:13 Swapped original and new tables OK.
2016-11-03T12:44:13 Rebuilding foreign key constraints...
2016-11-03T12:44:35 Rebuilt foreign key constraints OK.
2016-11-03T12:44:35 Dropping old table...
2016-11-03T12:44:35 Dropped old table `employees`.`_employees_old` OK.
2016-11-03T12:44:35 Dropping triggers...
2016-11-03T12:44:35 Dropped triggers OK.
Successfully altered `employees`.`employees`.

と、FKの貼り替えに結構時間がかかってしまいます。

--alter-foreign-keys-method=drop_swapだと速いは速いんですが

2016-11-03T12:47:13 Copied rows OK.
2016-11-03T12:47:13 Drop-swapping tables...
2016-11-03T12:47:13 Analyzing new table...
2016-11-03T12:47:13 Dropped and swapped tables OK.
Not dropping old table because --no-drop-old-table was specified.
2016-11-03T12:47:13 Dropping triggers...
2016-11-03T12:47:13 Dropped triggers OK.
Successfully altered `employees`.`employees`.

テーブルが存在しない瞬間があるので、プロダクションでは使いづらいです。

pt-online-schema-change-fast-rebuild-constraints.pl

--plugin=pt-online-schema-change-fast-rebuild-constraints.plとしてやると、--alter-foreign-keys-method=rebuild_constraintsでも一瞬でFKの貼り替えが終わります。

pt-online-schema-change \
  --alter 'ADD num int' \
  --alter-foreign-keys-method=rebuild_constraints \
  --plugin=pt-online-schema-change-fast-rebuild-constraints.pl \
  h=localhost,u=root,D=employees,t=employees \
  --execute
$ ./pt-osc.sh
...
2016-11-03T12:56:53 Copied rows OK.
2016-11-03T12:56:53 Analyzing new table...
2016-11-03T12:56:53 Swapping tables...
2016-11-03T12:56:53 Swapped original and new tables OK.
Disable foreign key checks
2016-11-03T12:56:53 Rebuilding foreign key constraints...
2016-11-03T12:56:53 Rebuilt foreign key constraints OK.
Enable foreign key checks
2016-11-03T12:56:53 Dropping old table...
2016-11-03T12:56:53 Dropped old table `employees`.`_employees_old` OK.
2016-11-03T12:56:53 Dropping triggers...
2016-11-03T12:56:53 Dropped triggers OK.
Successfully altered `employees`.`employees`.

ログを見るとわかると思いますが、FKの貼り替えの前後でFKのチェックを無効化→有効化するようにしています。 これでFK追加・削除時のテーブルコピーを行わないようにして、高速化しています。

余談

「テーブルのスワップ+FKの貼り替え」はアトミックな操作じゃないので、タイミングによっては「子テーブルにデータを挿入しようとしたら旧親テーブルのFKのせいで、制約違反になる」というタイミングがあるのではないかなぁ、と思ってたりしてます。

なので、

  1. FKを無効化
  2. 子テーブルのFKを削除
  3. 親テーブルをスワップ
  4. 子テーブルのFKを再作成
  5. FKを有効化

という手順がベストではないかと考えているのですが、プラグインだけでそこまでやるのは手間がかかりそうです。

*1:employees sample databaseを使ってます

hakoのoneshotを使う

hakoで、バッチ系の一発処理用のoneshotコマンドを使ってみる。

hakoのバージョンは>= hako-0.20.2(要Ruby 2.3)

$ ruby -v
ruby 2.3.0p0 (2015-12-25 revision 53290) [x86_64-darwin15]

$ gem install hako
...
Fetching: hako-0.20.2.gem (100%)
Successfully installed hako-0.20.2
5 gems installed

まず、例のごとくECSクラスタとEC2インスタンスを準備する。

ecs-cli configure -r ap-northeast-1 -c hello-hako-oneshot
ecs-cli up \
  --keypair winebarrel \
  --capability-iam \
  --vpc vpc-... \
  --subnets subnet-... \
  --security-group sg-... \
  --instance-type m4.large

f:id:winebarrel:20160915210052p:plain

おけ。

ログ出力用CloudWatch LogsにLogGroupを作っておく。

aws logs create-log-group --log-group-name my-logs

hakoのyamlは以下のような感じ。

  • hello.yml
scheduler:
  type: ecs
  region: ap-northeast-1
  cluster: hello-hako-oneshot
  desired_count: 1
app:
  image: busybox
  memory: 128
  log_configuration:
    log_driver: awslogs
    options:
      awslogs-group: my-logs
      awslogs-region: ap-northeast-1
      awslogs-stream-prefix: example

実行してみる。

$ hako oneshot hello.yml echo hello
I, [2016-09-15T21:19:19.668005 #50187]  INFO -- : Registered task definition: arn:aws:ecs:ap-northeast-1:822997939312:task-definition/hello-oneshot:2
I, [2016-09-15T21:19:19.795313 #50187]  INFO -- : Started task: arn:aws:ecs:ap-northeast-1:822997939312:task/008875de-41d1-49ea-88c9-29ea1270384e
I, [2016-09-15T21:19:20.880933 #50187]  INFO -- : Container instance is arn:aws:ecs:ap-northeast-1:822997939312:container-instance/71b35bd6-6d06-486a-955a-6dd24b2ca1ec (ECS Instance - amazon-ecs-cli-setup-hello-hako-oneshot i-0a295d5b1ff678c4f)
I, [2016-09-15T21:19:24.158628 #50187]  INFO -- : Started at 2016-09-15 21:19:23 +0900
I, [2016-09-15T21:19:24.158756 #50187]  INFO -- : Stopped at 2016-09-15 21:19:23 +0900 (reason: Essential container in task exited)
I, [2016-09-15T21:19:24.158802 #50187]  INFO -- : Oneshot task finished
I, [2016-09-15T21:19:24.158840 #50187]  INFO -- : app has stopped with exit_code=0

ログを見てみる。

f:id:winebarrel:20160915212010p:plain

f:id:winebarrel:20160915212016p:plain

おけおけ。

Wakerを動かす

github.com

認証まわりのセットアップ

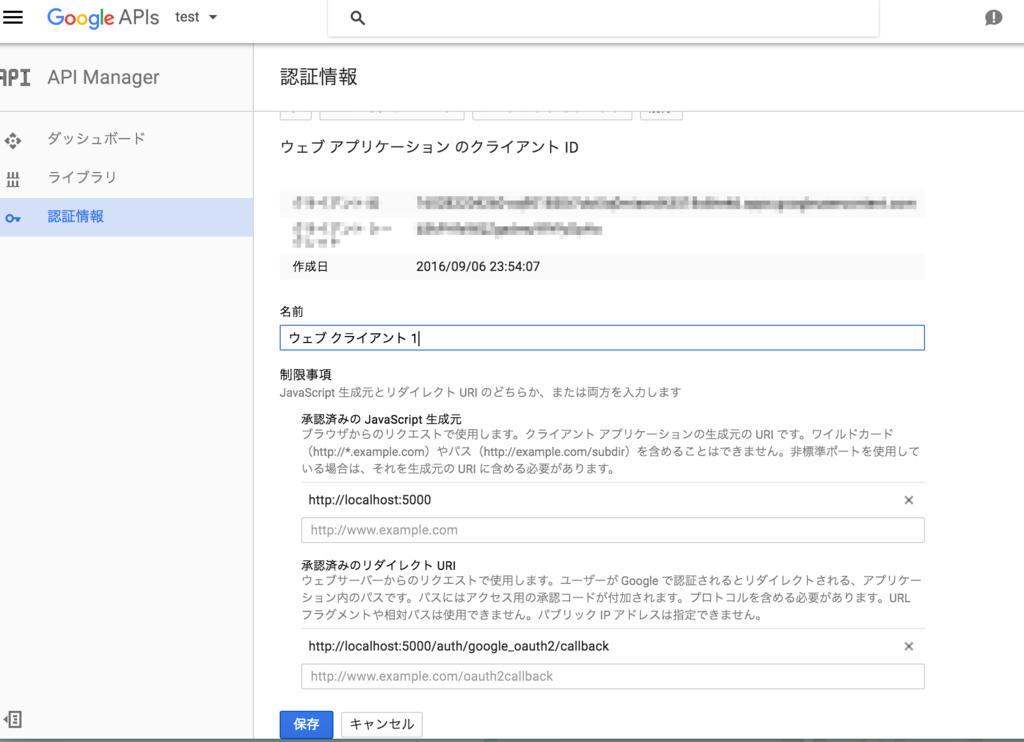
Google Developer Consoleで適当なプロジェクトを作って、OAuth 2.0 クライアント IDを発行する。

f:id:winebarrel:20160915192114p:plain

  • 承認済みの JavaScript 生成元:
    • http://localhost:5000
  • 承認済みのリダイレクト URI:
    • http://localhost:5000/auth/google_oauth2/callback

.envファイルに認証情報を書いておく。

echo 'GOOGLE_CLIENT_ID=...' >> .env
echo 'GOOGLE_CLIENT_SECRET=...' >> .env
echo 'GOOGLE_DOMAIN=...' >> .env # If you restrict to use Google Apps doma

セットアップ

まず、bundle install

$ bundle install
Using rake 11.2.2
...
Bundle complete! 31 Gemfile dependencies, 113 gems now installed.
Use `bundle show [gemname]` to see where a bundled gem is installed.

MySQLを起動。

$ mysql.server start
Starting MySQL
.. SUCCESS!

Redisも起動。

$ redis-server &
[1] 9337
...
[9337] 15 Sep 19:14:36.797 * The server is now ready to accept connections on port 6379

データベースをセットアップ。

]$ rake db:create
[DEPRECATION] `last_comment` is deprecated.  Please use `last_description` instead.
[DEPRECATION] `last_comment` is deprecated.  Please use `last_description` instead.
[DEPRECATION] `last_comment` is deprecated.  Please use `last_description` instead.
$ rake db:migrate
...
== 20160914063913 AddCommentIndex: migrated (0.0592s) =========================

サーバを起動。

$ bundle exec foreman start -f Procfile.docker
...
19:28:49 web.1                | * Listening on tcp://0.0.0.0:5000
19:28:49 web.1                | Use Ctrl-C to stop```

ユーザのセットアップ

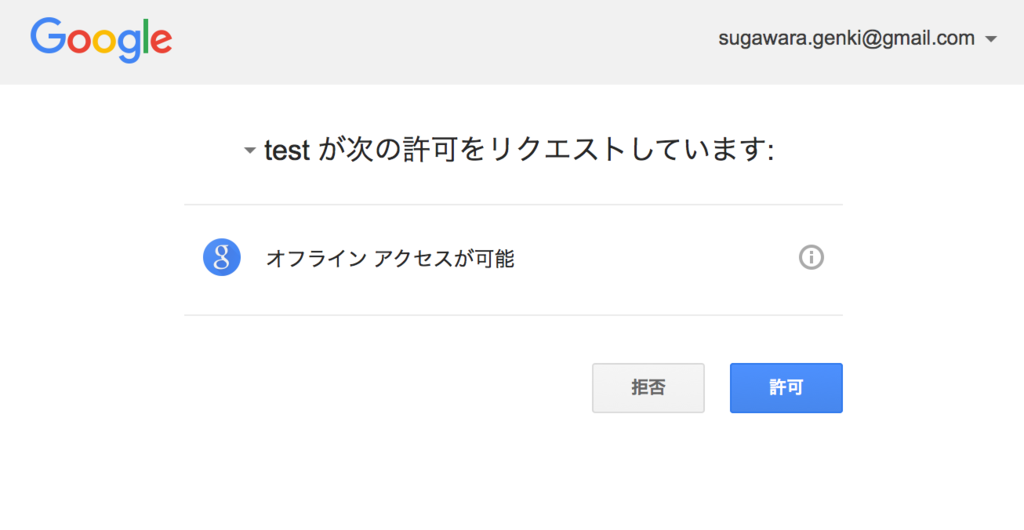
http://localhost:5000/にアクセスすると、Googleアカウントで認証される。

f:id:winebarrel:20160915193024p:plain

ただし認証直後はユーザは非アクティブ。

f:id:winebarrel:20160915193150p:plain

なので、DBをいじってアクティベートする。

$ bundle exec rails runner 'User.first.update!(active: true)'

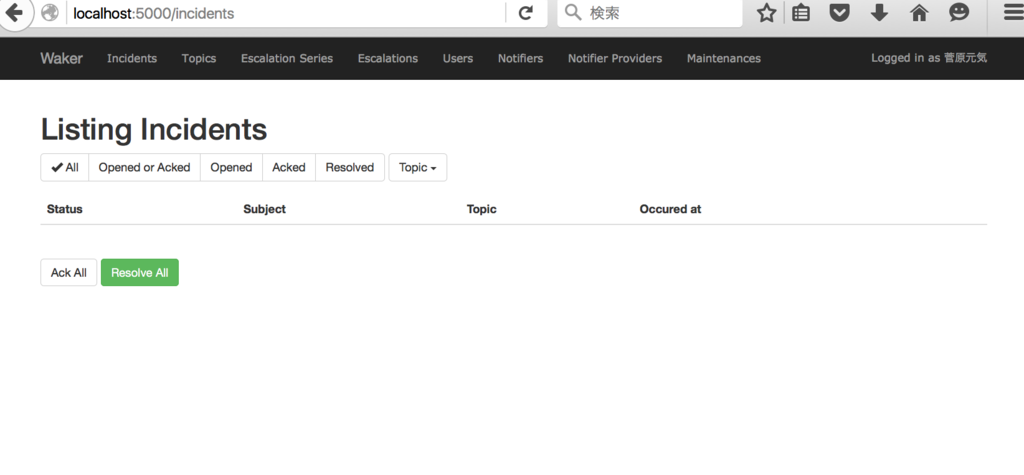
再度アクセスすると、トップ画面が表示される。

f:id:winebarrel:20160915193404p:plain

Wakerのセットアップ

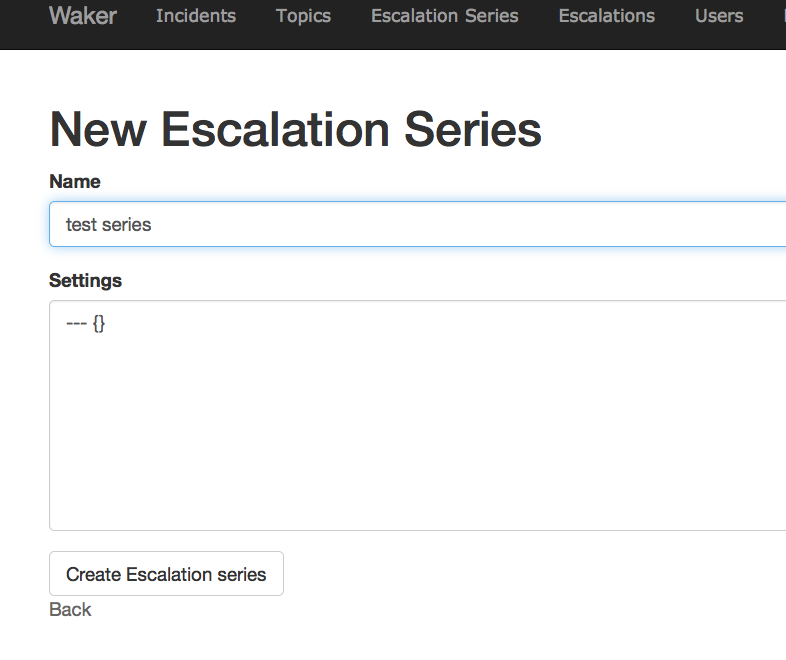
Escalation Seriesを作る

f:id:winebarrel:20160915193552p:plain

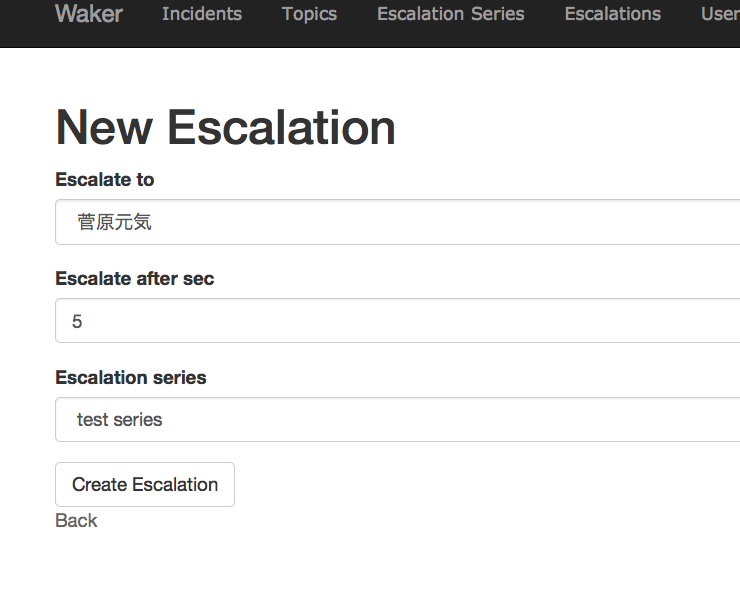
Escalationを作る

f:id:winebarrel:20160915193708p:plain

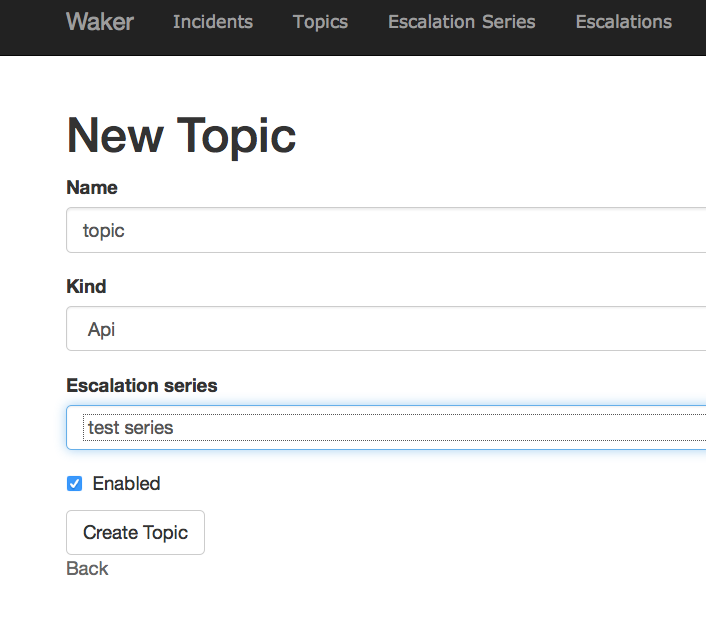
Topicを作る

f:id:winebarrel:20160915194240p:plain

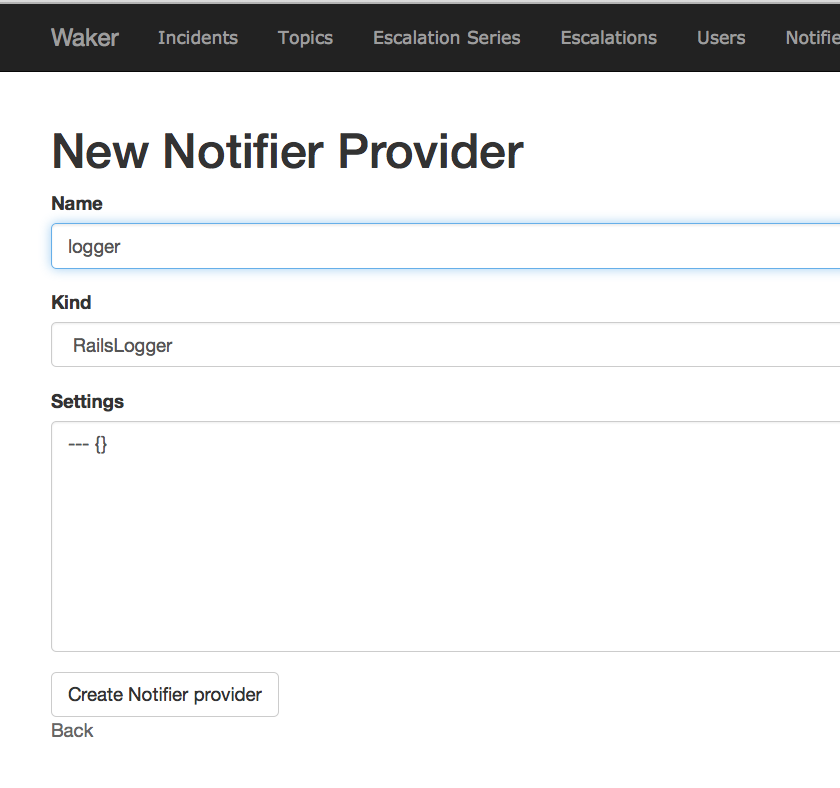
Notifier Providerを作る

今回はRailsLogger。

f:id:winebarrel:20160915193833p:plain

どういうProviderがあって、どういう設定値を必要としているかは、notifier_provider.rbを見るとよい。

Notifierを作る

今回はRailsLoggerなので、詳細な設定とユーザへのひも付けは不要。

f:id:winebarrel:20160916003738p:plain

動作確認

以下のようにcurlAPIをたたく。

$ curl -s -XPOST "localhost:5000/topics/1/mailgun.json" -d 'subject=foo&body-plain=bar'
{}

するとIncidentが作成されて

f:id:winebarrel:20160915195622p:plain

ログの方に(わかりにくいけど)

Notification: opened

と出力される。 default.text.erbをいじれば、もう少し詳細な情報を出力できる。

MailgunからIncidentを作る

Routeのとこで

f:id:winebarrel:20160915203340p:plain

こんな感じでStore and notify設定してMailgun宛てにメール投げれば、Incidentされる…はず。

IncidentのイベントをSlackに通知する

Incoming Webhookを作る

適当にIncoming Webhookを作る。

f:id:winebarrel:20160915202443p:plain

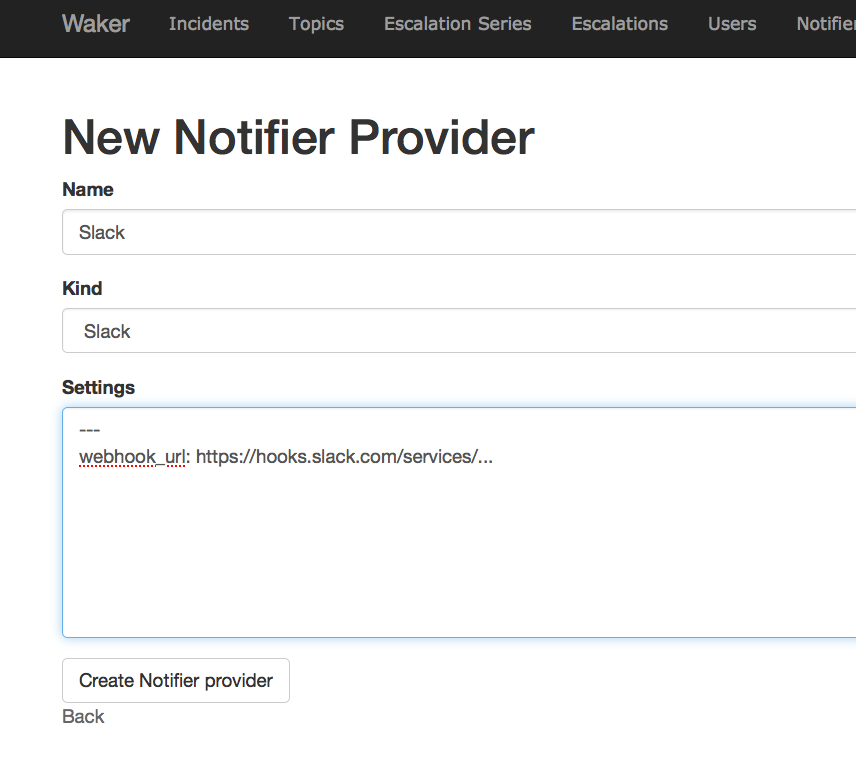
Notifier Providerを作る

f:id:winebarrel:20160915202730p:plain

Notifierを作る

f:id:winebarrel:20160916003907p:plain

動作確認

curlでIncidentを作ってみる。

 curl -XPOST "localhost:5000/topics/1/mailgun.json" -d 'subject=hello&body-plain=world'
{}

Slackに通知が来る。

f:id:winebarrel:20160915202941p:plain

hakoがALBに対応したので使ってみた

github.com

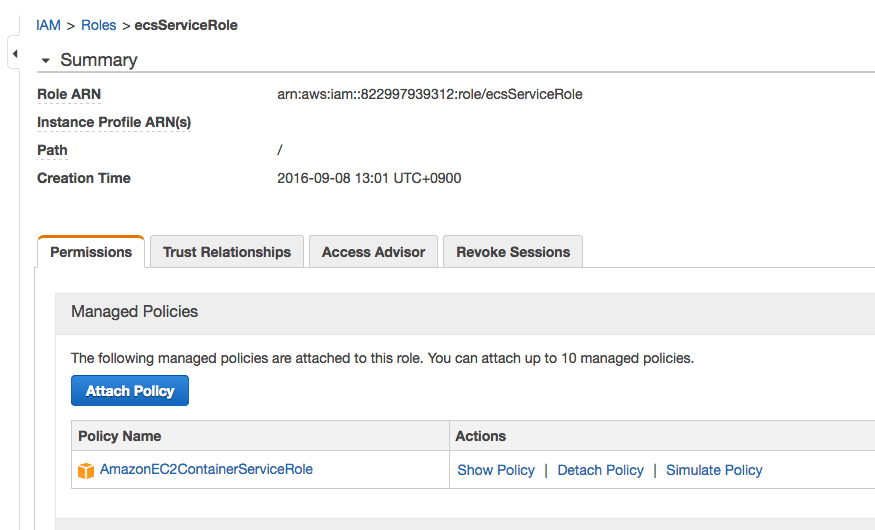
まず、ALB用のロールを作成(自動的には作成されないので要注意)

f:id:winebarrel:20160908132224p:plain

こんな感じでAmazonEC2ContainerServiceRoleをアタッチしたecsServiceRoleを作成。

新しいタスク定義は以下の通り。

  • hello-hako.yml
scheduler:
  type: ecs
  region: ap-northeast-1
  cluster: hello-hako
  desired_count: 2
  role: ecsServiceRole
  elb_v2:
    vpc_id: vpc-...
    listeners:
      - port: 80
        protocol: HTTP
    subnets:
      - subnet-...
      - subnet-...
    security_groups:
      - sg-...
app:
  image: nginx
  memory: 300
  cpu: 256
  essential: true
  mount_points:
    - container_path: /usr/share/nginx/html
      source_volume: vol
  #port_mappings:
  #  - host_port: 0
  #    container_port: 80
additional_containers:
  front:
    image_tag: nginx
    memory: 32
    cpu: 32
    port_mappings:
      - host_port: 0
        container_port: 80
    mount_points:
      - container_path: /var/log/httpd
        source_volume: log
    volumes_from:
      - source_container: app
  busybox:
    image_tag: busybox
    cpu: 64
    memory: 256
    env:
      MSG: hello
    volumes_from:
      - source_container: app
    # entry_pointはまだ使えないっぽい
    command:
      - /bin/sh
      - -c
      - |
        while true; do
          date >> /usr/share/nginx/html/index.html
          echo $MSG >> /usr/share/nginx/html/index.html
          echo '<br>' >> /usr/share/nginx/html/index.html
          sleep 3
        done
volumes:
  vol: {}
  log:
    source_path: /var/log/httpd

今回のappコンテナはnginxだけど、ただのボリューム置き場です。

frontコンテナは必須。

この状態で、hako deploy hello-hako.ymlすると

ELBが作られて f:id:winebarrel:20160908133330p:plain

ターゲットグループが作られて f:id:winebarrel:20160908133418p:plain

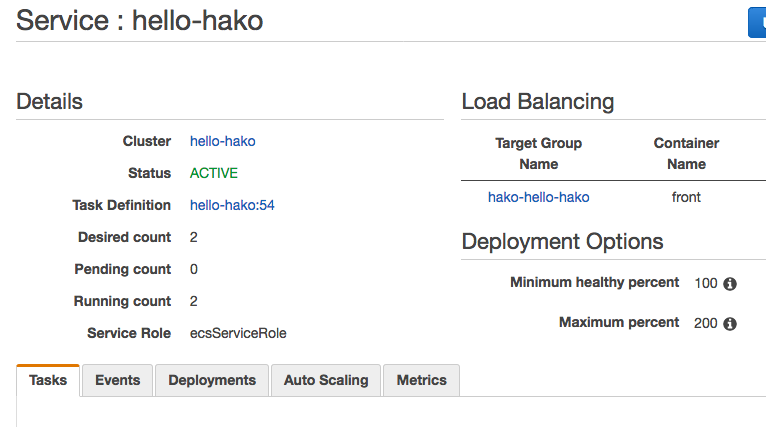
で、サービスができる。 f:id:winebarrel:20160908133511p:plain

ALBにアクセス。

~$ curl -s hako-hello-hako-910297360.ap-northeast-1.elb.amazonaws.com | head
Thu Sep  8 04:16:59 UTC 2016
hello
<br>
Thu Sep  8 04:17:02 UTC 2016
hello
<br>
Thu Sep  8 04:17:05 UTC 2016
hello
<br>
Thu Sep  8 04:17:08 UTC 2016

おけおけ。

関連: ECS+ALB+hakoでホットデプロイ - so what