apt-transport-s3をGoに移植した

apt-transport-s3をGoに移植してapt-transport-s3-goを作った。

github.com

これは何?

aptのリポジトリとしてS3を利用できるようにするやつ。 すでにapt-transport-s3が存在しているのだがあまりメンテナンスされている様子がなく、またpythonpython-configobjに依存しているのでコンテナから使いづらい。ECSのタスクロールにも対応してなさそう。

あと作ってから気がついたがapt-golang-s3というのもあるが、こちらはソースコードからのインストールがやや手間そう。apt-transport-s3同様にECSのタスクロールに対応していなさそう。

という感じで主に

  • GitHub ActionsでのDockerイメージの作成時のパッケージインストール(OIDCのクレデンシャルの利用)
  • ECS上のコンテナでのパッケージインストール

にS3を利用するために作成した。

※なおS3のバケットに置くリポジトリのファイルはaptlyなどで作成する必要がある*1

使い方

まずS3のリージョンを設定する。

echo 'Acquire::s3::region ap-northeast-1;' > /etc/apt/apt.conf.d/s3

# リージョンはURIに組み込みたかったが良い文法が思いつかなかった

それからsources.listを作成する。

echo 'deb s3://my-bucket/repo/ xenial main' > /etc/apt/sources.list.d/s3.list

これであとはapt update apt installすればS3からパッケージをインストールできる。

なお、LoadDefaultConfig以外でのクレデンシャルのロードは、現状やっていない。

aws.github.io

おまけ: APT Method Interface

APT Method Interfaceというaptコマンド?とapt transport?とのインタフェースの仕様があって、これに従ったプロトコルでapt↔apt transportでメッセージをやりとりする。

標準入出力でやりとりする HTTP/1 みたいなテキストのプロトコルで、標準入力から

601 Configuration
Config-Item: Acquire::http::Proxy=http://example.com

というメッセージを受け取ったら設定を行い

600 URI Acquire
URI: s3://example.com/key
Filename:Packages.downloaded

というメッセージを受け取ったらを行い、最後に

201 URI Done
URI: s3://example.com/key
Filename:Packages.downloaded

というメッセージを返すというなかシンプルなプロトコルでわかりやすかった。

*1:www.aptly.infoが落ちている…(2022/02/26現在)リリースも滞っている感じ

Golang: pkg/errorsのスタックトレースをきれい表示するやつとDatadogのエラートラッキング

三行で

  • pkg/errorsのスタックトレースが見にくい
  • DatadogのError Trackingが見にくい
  • まあまあなんとかするやつを作った

pkg/errors

Goのスタックトレース事情については、以下を参照のこと。

zenn.dev

現状では標準ライブラリにスタックトレースが実装されていないので、とりあえずpkg/errorsを使っている*1が、スタックトレースの表示がめちゃくちゃ見にくい。

package main

import (
    "fmt"
    "os"

    "github.com/pkg/errors"
)

func main() {
    err := f1()
    fmt.Printf("%+v", err)
}

func f1() error {
    return errors.Wrap(f2(), "from f1()")
}

func f2() error {
    return errors.Wrap(f3(), "from f2()")
}

func f3() error {
    _, err := os.Open("not_found")
    return errors.Wrap(err, "from f3()")
}

gist.github.com

なのでもう少しきれいに表示するライブラリを作った。

github.com

pperr.Print(err)

以下のように表示される。

gist.github.com

若干重い処理をしているが、エラー発生時は仕方ないということにした。

Datadogのエラートラッキング

DatadogはAPMに統合されたエラートラッキング機能を提供していて、Golangにも対応している。 APMの1リクエストに紐付いたエラーを表示できるが、スタックトレースの抽出が貧弱であんまりイケてない。

   router.HandleFunc("/hello", func(rw http.ResponseWriter, r *http.Request) {
        span, _ := tracer.SpanFromContext(r.Context())
        err := f1()

        if err != nil {
            rw.WriteHeader(http.StatusInternalServerError)
            span.SetTag(ext.Error, err)
        } else {
            fmt.Fprintln(rw, "hello")
        }
    })

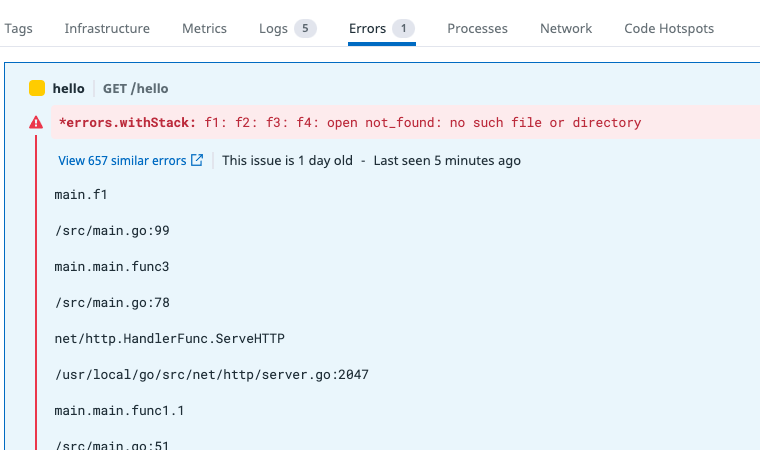
上記のようにspan.SetTag(ext.Error, err)するとこのような表示になる。

f:id:winebarrel:20220220174212p:plain

ext.ErrorDetailsにpkg/errorsのスタックトレースをセットしているが、コンソールに表示されるのはtakeStacktrace()のほうらしい。 なので直接ext.ErrorStackを設定する。

           span.SetTag(ext.Error, err)
            span.SetTag(ext.ErrorStack, pperr.Sprint(err))

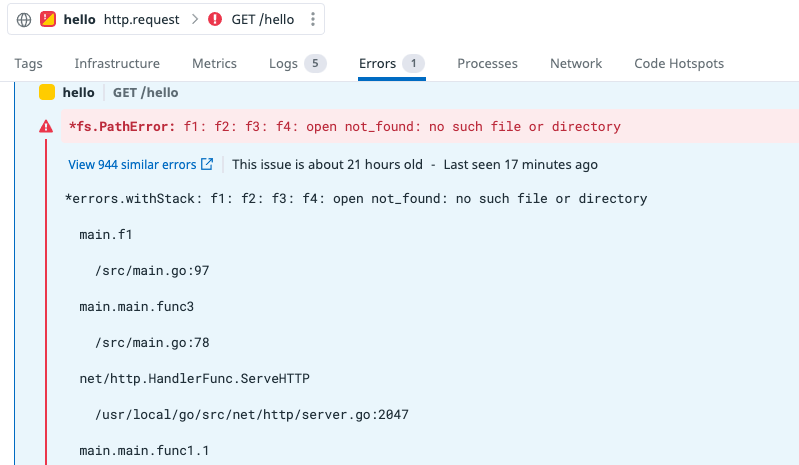
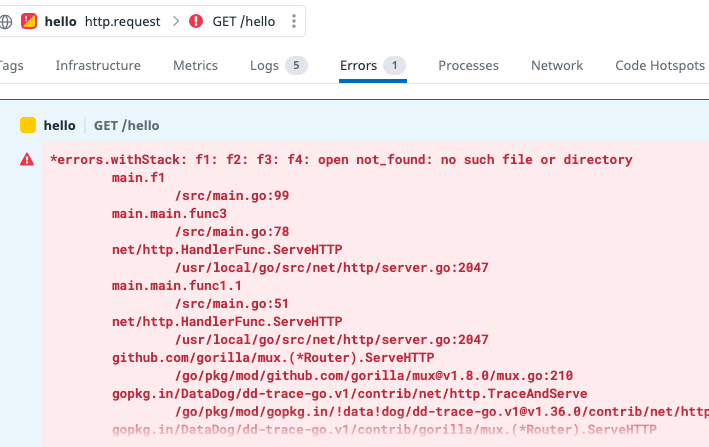
一応、スタックトレースが表示されるが、インデントが潰れてあんまり見やすくない。

f:id:winebarrel:20220220175441p:plain

なのでインデントを全角スペースするという微妙なことをする。 さらにErrorTypeとして*errors.withStackが表示されてもうれしくないので、直近のcause error typeを表示するようにする。

            span.SetTag(ext.Error, err)
            span.SetTag(ext.ErrorStack, pperr.SprintFunc(err, pperr.NewPrinterWithIndent("    ")))
            span.SetTag(ext.ErrorType, pperr.CauseType(err))

これでまあまあ見やすくなったと思う。

f:id:winebarrel:20220220175834p:plain

ちなみにext.ErrorTypeスタックトレースをセットするというさらによろしくなさそうなことをすると、全角スペースは不要になる。

           span.SetTag(ext.ErrorType, pperr.Sprint(err))

f:id:winebarrel:20220220180058p:plain

エラー表示の機能的にはSentryと大きな違いはなさそうだけれど、UXがだいぶ劣っているのでDatadogにはもう少し頑張って欲しい。 (フィードバックしたらなんとかなるだろうか)

*1:アーカイブ済みなのは把握しているが、代替を見つけられていないので…

Kinesis Firehose経由でRDS(PostgreSQL)のスロークエリをOpenSearchに集めるやつ

github.com

以前業務でMySQLのRDSのスロークエリをCloudWatch Logs サブスクリプションフィルター+LambdaでAmazon ES(現OpenSearch)に集めるやつを作った

似たようなものをPostgreSQLのRDSで作ったのだが、今回の要件ではクロスアカウントでログを集計する必要があったため、Kinesis Firehoseを経由する必要があった。

cf. Kinesis Data Firehose を使用したクロスアカウントログデータ共有 - Amazon CloudWatch Logs

※ちなみにサブスクリプションフィルター+クロスアカウントのCloudWatch Logsはできそうな雰囲気がありそうでできなかった(たぶん現状Kinesisしか対応していないと思う)

Kinesis FirehoseでLambdaを使ってCloudWatch Logsのデータ変換を行おうと思うとのが、CloudWatch Logsが1レコード内に複数イベント詰めてくるのに対して、データ変換後のOpenSearchへの出力は1レコード・1イベントにする必要があり、無理矢理複数イベントを詰め込むとエラーになる。

公式にはマルチレコードに対応していない雰囲気なのだがハックがあった

stackoverflow.com

複数データの途中にインデックスのアクションを挟むことにより、OpenSearchが複数レコードをインポートしてくれる。 ※先頭にはアクションは付けない

{"foo":"bar","request_logged_at":"2017-02-07T15:13:01.39256Z"}
{ "index" : { "_index" : "my-index" } }
{"foo":"bar","request_logged_at":"2017-02-07T15:13:01.39256Z"}
{ "index" : { "_index" : "my-index" } }
{"foo":"bar","request_logged_at":"2017-02-07T15:13:01.39256Z"}

ということで、冒頭のlambdaのコードは一応、元気に動いている。

あと、GoでのKinesis Firehose+Lambdaのデータ変換は以下のブログが参考になった。

tech.gunosy.io

esaのCLIを作った

github.com

これは何?

esaCLIです。 AWS CLIでs3を操作するのと同じような感覚でesaを操作できます。

使い方

see https://github.com/winebarrel/kasa#usage

最初に環境変数ESA_TOKENESA_TEAMの設定が必要です。

記事の一覧を出す

% kasa ls | head
2021-09-07 11:07:44  -    https://winebarrel.esa.io/posts/1        README
2021-09-12 05:57:43  -    https://winebarrel.esa.io/posts/13       Templates/hohおあ
2021-09-07 11:07:44  -    https://winebarrel.esa.io/posts/3        Templates/手順書/title
2021-09-07 11:07:44  -    https://winebarrel.esa.io/posts/2        Templates/日報/%{Year}/%{month}/%{day}/%{me}:title
2021-09-07 11:07:45  -    https://winebarrel.esa.io/posts/4        Templates/議事録/%{Year}/%{month}/%{day}/会議名
2021-09-11 05:57:44  -    https://winebarrel.esa.io/posts/5        fdsafadsfa
2022-01-09 01:56:29  -    https://winebarrel.esa.io/posts/25       test3/test
2022-01-09 12:55:41  -    https://winebarrel.esa.io/posts/26       雑/test (1)
2022-01-09 12:55:41  -    https://winebarrel.esa.io/posts/27       雑/test (2)
2022-01-09 12:55:41  -    https://winebarrel.esa.io/posts/28       雑/test (3)

カテゴリを指定して記事の一覧を出す

% kasa ls 雑/
2022-01-09 12:55:41  -    https://winebarrel.esa.io/posts/26       雑/test (1)
2022-01-09 12:55:41  -    https://winebarrel.esa.io/posts/27       雑/test (2)
2022-01-09 12:55:41  -    https://winebarrel.esa.io/posts/28       雑/test (3)
2022-01-09 12:55:42  -    https://winebarrel.esa.io/posts/29       雑/test (4)
2022-01-09 12:55:42  -    https://winebarrel.esa.io/posts/30       雑/test (5)

タグを指定して記事の一覧を出す

% kasa ls '#hoge'
2022-01-09 11:59:18  -    https://winebarrel.esa.io/posts/6        雑3/test  [#hoge]
2022-01-09 11:59:18  -    https://winebarrel.esa.io/posts/7        雑3/ざっつ  [#hoge]
2022-01-09 12:22:53  WIP  https://winebarrel.esa.io/posts/19       雑3/ざっつ (1)  [#hoge]
2022-01-09 11:59:18  -    https://winebarrel.esa.io/posts/8        雑3/ほげ  [#hoge]
2022-01-09 01:44:35  -    https://winebarrel.esa.io/posts/9        雑5/fadsfd  [#hoge]

記事を検索する

see https://docs.esa.io/posts/104

% kasa search wip:true
2022-01-09 12:22:53  WIP  https://winebarrel.esa.io/posts/19       雑3/ざっつ (1)  [#hoge]
2022-01-09 12:21:38  WIP  https://winebarrel.esa.io/posts/11       雑5/fadsfasdfad

記事を出力する

% kasa cat README | head
##  :hatching_chick: esa へようこそ

esaは、[《情報を育てる》というコンセプト](https://esa.io/concept) で作られた、自律的なチームのためのドキュメント共有サービスです。
日報やミーティングの議事録をはじめ、仕様書やアイデアのメモなど様々なドキュメントに利用することができます。

### :memo: 簡単な記事の書き方

- 左上の "__NEW POST__" から記事を書き始めることができます
- 記事タイトル入力欄に、半角の `/` (スラッシュ) 区切りでカテゴリを作ることができます
    - (例)`カテゴリ1/カテゴリ2/記事タイトル` のように入力してみてください

記事を投稿する

% date | kasa post -b - -n hello -c 'foo/bar'
https://winebarrel.esa.io/posts/34
% kasa cat foo/bar/hello
2022年 1月 9日 日曜日 14時41分44秒 JST

記事を更新する

% echo updated | kasa post 34 -b -
https://winebarrel.esa.io/posts/34
% kasa cat foo/bar/hello
updated

記事をリネームする

% kasa mv hello/world/my-title hello/world/my-title2
mv 'hello/world/my-title' 'hello/world/my-title2'
Do you want to move posts? (y/n) [n]: y

カテゴリを指定して記事をまとめて移動する

% kasa ls 雑/
2022-01-09 12:55:41  -    https://winebarrel.esa.io/posts/26       雑/test (1)
2022-01-09 12:55:41  -    https://winebarrel.esa.io/posts/27       雑/test (2)
2022-01-09 12:55:41  -    https://winebarrel.esa.io/posts/28       雑/test (3)
2022-01-09 12:55:42  -    https://winebarrel.esa.io/posts/29       雑/test (4)
2022-01-09 12:55:42  -    https://winebarrel.esa.io/posts/30       雑/test (5)
% kasa mv 雑/ 雑x/
mv '雑/test (1)' '雑x/'
mv '雑/test (2)' '雑x/'
mv '雑/test (3)' '雑x/'
mv '雑/test (4)' '雑x/'
mv '雑/test (5)' '雑x/'
Do you want to move posts? (y/n) [n]: y
% kasa ls 雑x/
2022-01-09 02:11:05  -    https://winebarrel.esa.io/posts/26       雑x/test (1)
2022-01-09 02:11:05  -    https://winebarrel.esa.io/posts/27       雑x/test (2)
2022-01-09 02:11:05  -    https://winebarrel.esa.io/posts/28       雑x/test (3)
2022-01-09 02:11:06  -    https://winebarrel.esa.io/posts/29       雑x/test (4)
2022-01-09 02:11:06  -    https://winebarrel.esa.io/posts/30       雑x/test (5)

タグを指定して記事をまとめて移動する

% kasa ls '#hoge'
2022-01-09 11:59:18  -    https://winebarrel.esa.io/posts/6        雑3/test  [#hoge]
2022-01-09 11:59:18  -    https://winebarrel.esa.io/posts/7        雑3/ざっつ  [#hoge]
2022-01-09 12:22:53  WIP  https://winebarrel.esa.io/posts/19       雑3/ざっつ (1)  [#hoge]
2022-01-09 11:59:18  -    https://winebarrel.esa.io/posts/8        雑3/ほげ  [#hoge]
2022-01-09 01:44:35  -    https://winebarrel.esa.io/posts/9        雑5/fadsfd  [#hoge]
% kasa mv '#hoge' hello/
mv '雑3/test' 'hello/'
mv '雑3/ざっつ' 'hello/'
mv '雑3/ざっつ (1)' 'hello/'
mv '雑3/ほげ' 'hello/'
mv '雑5/fadsfd' 'hello/'
Do you want to move posts? (y/n) [n]: y
% kasa ls hello/
2022-01-09 02:12:19  -    https://winebarrel.esa.io/posts/9        hello/fadsfd  [#hoge]
2022-01-09 02:12:18  -    https://winebarrel.esa.io/posts/6        hello/test  [#hoge]
2022-01-09 02:10:04  -    https://winebarrel.esa.io/posts/31       hello/world/my-title2
2022-01-09 02:12:18  -    https://winebarrel.esa.io/posts/7        hello/ざっつ  [#hoge]
2022-01-09 02:12:18  WIP  https://winebarrel.esa.io/posts/19       hello/ざっつ (1)  [#hoge]
2022-01-09 02:12:18  -    https://winebarrel.esa.io/posts/8        hello/ほげ  [#hoge]

記事を削除する

% kasa rmi 31

タイトルを指定して記事を削除する

% kasa ls test/
2022-01-09 02:44:27  -    https://winebarrel.esa.io/posts/26       test/test (1)
2022-01-09 02:44:27  -    https://winebarrel.esa.io/posts/27       test/test (2)
2022-01-09 02:44:28  -    https://winebarrel.esa.io/posts/28       test/test (3)
2022-01-09 02:44:28  -    https://winebarrel.esa.io/posts/29       test/test (4)
2022-01-09 02:44:28  -    https://winebarrel.esa.io/posts/30       test/test (5)  [#hoge,#fuga]
% kasa rm 'test/test (1)'
rm 'test/test (1)'
Do you want to delete posts? (y/n) [n]: y
% kasa ls test/
2022-01-09 02:44:27  -    https://winebarrel.esa.io/posts/27       test/test (2)
2022-01-09 02:44:28  -    https://winebarrel.esa.io/posts/28       test/test (3)
2022-01-09 02:44:28  -    https://winebarrel.esa.io/posts/29       test/test (4)
2022-01-09 02:44:28  -    https://winebarrel.esa.io/posts/30       test/test (5)  [#hoge,#fuga]

カテゴリを指定して記事をまとめて削除する

% kasa rm 雑5/
rm '雑5/2'
rm '雑5/fadsfasdfad'
rm '雑5/ほふぁ'
Do you want to delete posts? (y/n) [n]: y

タグを指定して記事をまとめて削除する

% kasa rm '#hoge'
rm 'hello/fadsfd'
rm 'hello/test'
rm 'hello/ざっつ'
rm 'hello/ざっつ (1)'
rm 'hello/ほげ'
Do you want to delete posts? (y/n) [n]: y

カテゴリ名をリネームする

% kasa ls 雑x/
2022-01-09 02:11:05  -    https://winebarrel.esa.io/posts/26       雑x/test (1)
2022-01-09 02:11:05  -    https://winebarrel.esa.io/posts/27       雑x/test (2)
2022-01-09 02:11:05  -    https://winebarrel.esa.io/posts/28       雑x/test (3)
2022-01-09 02:11:06  -    https://winebarrel.esa.io/posts/29       雑x/test (4)
2022-01-09 02:11:06  -    https://winebarrel.esa.io/posts/30       雑x/test (5)
% kasa mvcat 雑x/ 雑x2/
% kasa ls 雑x2/
2022-01-09 02:11:05  -    https://winebarrel.esa.io/posts/26       雑x2/test (1)
2022-01-09 02:11:05  -    https://winebarrel.esa.io/posts/27       雑x2/test (2)
2022-01-09 02:11:05  -    https://winebarrel.esa.io/posts/28       雑x2/test (3)
2022-01-09 02:11:06  -    https://winebarrel.esa.io/posts/29       雑x2/test (4)
2022-01-09 02:11:06  -    https://winebarrel.esa.io/posts/30       雑x2/test (5)

※反映まで若干タイムラグがある気がします

記事の情報を出す

% ./kasa info 1
{
  "number": 1,
  "name": "README",
  "full_name": "README",
  "wip": false,
  "created_at": "2021-09-07T23:07:44+09:00",
  "message": "Created by team initialization.",
  "url": "https://winebarrel.esa.io/posts/1",
  "updated_at": "2021-09-07T23:07:44+09:00",
  "tags": [],
  "category": "",
  "revision_number": 1,
  "created_by": {
    "myself": false,
    "name": "esa_bot",
    "screen_name": "esa_bot",
    "icon": "https://img.esa.io/uploads/production/users/83/icon/thumb_m_1bca40cedfd2cfd0f636f2ac9c0bbad6.jpg"
  },
  "updated_by": {
    "myself": false,
    "name": "esa_bot",
    "screen_name": "esa_bot",
    "icon": "https://img.esa.io/uploads/production/users/83/icon/thumb_m_1bca40cedfd2cfd0f636f2ac9c0bbad6.jpg"
  }
}

ecspressoをラップしたkubectl runっぽいことをするツールを書いた

ecspressoをラップしたkubectl runっぽいことをするツールを書いた。

github.com

これはなに?

~/.demitas/ 配下に設定ファイルの元をおいてランタイムでimage等を上書きし、最終的にecspresso runを実行するツール。

~/.demitas
├── db
│   ├── ecs-container-def.jsonnet
│   ├── ecs-service-def.jsonnet
│   ├── ecs-task-def.jsonnet
│   └── ecspresso.yml
├── ecs-container-def.jsonnet
├── ecs-service-def.jsonnet
├── ecs-task-def.jsonnet
└── ecspresso.yml
~% demitas -c '{image: "public.ecr.aws/runecast/busybox:1.33.1", command: [echo, test]}'
2021/10/30 16:52:45 hello/hello Running task
2021/10/30 16:52:45 hello/hello Registering a new task definition...
2021/10/30 16:52:46 hello/hello Task definition is registered busybox:46
2021/10/30 16:52:46 hello/hello Running task
2021/10/30 16:52:47 hello/hello Task ARN: arn:aws:ecs:ap-northeast-1:822997939312:task/hello/d51ca2de190548e2a2b8e8c9644cfab1
2021/10/30 16:52:47 hello/hello Waiting for run task...(it may take a while)
2021/10/30 16:52:47 hello/hello Watching container: busybox
2021/10/30 16:52:47 hello/hello logGroup: /ecs/busybox
2021/10/30 16:52:47 hello/hello logStream: ecs/busybox/d51ca2de190548e2a2b8e8c9644cfab1
...

clusterとかとかserviceとかsecurity groupとかもコマンドラインで上書きできる。 上書き用の引数の値はYAMLJSONを取るのでややシンプルに書ける。

containerDefinitionsの配列の上書きは難しいので、割り切って1コンテナとした。

~% cat ~/.demitas/ecs-container-def.jsonnet
{
  cpu: 0,
  essential: true,
  name: 'busybox',
  logConfiguration: {
    logDriver: 'awslogs',
    options: {
      'awslogs-group': '/ecs/busybox',
      'awslogs-region': 'ap-northeast-1',
      'awslogs-stream-prefix': 'ecs',
    },
  },
  linuxParameters: {
    initProcessEnabled: true,
  },
}

~/.demitas配下にprofileフォルダを掘っておくと demitas -p <profile>で切り替えられる。

モチベーションとか

  • kubectl runっぽいことがやりたいけど、imageの上書きとかがめんどくさい(環境変数を使うとか)
  • アプリケーションデプロイ用のタスク定義にoneshotのための設定を混ぜ込みたくない
  • 作業ディレクトリにあんまり縛られたくない

こう、アプリケーションのデプロイ用のタスク定義と二重管理になっているのが気になっているが、サービス使って常駐するのものとoneshotのものでは微妙に定義が違ったりするので、分けておいた方がいいかなぁ、と。 kubectl runほど柔軟ではないけどちょっと作業するタスクを起動するのはよいかなと思ってます。 oneshotのためのタスク定義ファミリー名とかロールとかCloudWatch Logsとか用意する必要あるけど

その他

先日調査したECS Fargateでのポートフォワーディング用のラッパーも作った。

github.com

(ただのラッパー。シェルスクリプトと変わらず)

demitasでstoneを起動して、ecs-exec-pfでポートフォワーディングして手元からDB操作とかできるはず。

demitas -c '{image: public.ecr.aws/o0p0b7e7/stone, command: ["db-endpoint:5432", "5432"]}' -- --wait-until=running
ecs-exec-pf -c my-cluster -t 0113f61a4b1044d99c627daeee8c0d0c -p 5432 -l 15432
psql  -h localhost -p 15432

GitHub Actionsでリポジトリローカルなactionを実行する

同じリポジトリ内にあるactionを uses: ./.github/actions/my-action のようなかたちで使うやつ。

以下の記事が詳しい:

qiita.com

node_modulesのコミットが必要でactions/toolkitが使いにくいが、素のNode.jsでもいろいろできる。 処理を共通化したいけどサードパーティーのactionを使いたくない…という時に便利。

入出力とか

  • 入力は process.env.INPUT_... という環境変数からとれる
  • 出力は process.stdout.write("::set-output ...") とかでできる
  • もっとスマートなやり方はわからず
  • xxxSyncをrequireすればたいていのことはできる印象

ecspressoのインストール

  • .github/actions/install-ecspresso/action.yml
name: install-ecspresso
description: Install ecspresso
runs:
  using: node12
  main: index.js
inputs:
  version:
    description: ecspresso version
    default: 1.6.2
    required: true
  • .github/actions/install-ecspresso/index.js
const { execSync } = require("child_process");
const { renameSync } = require("fs");

let version = process.env.INPUT_VERSION;
let url = `https://github.com/kayac/ecspresso/releases/download/v${version}/ecspresso_${version}_linux_amd64.tar.gz`;

execSync(`curl -sSfL ${url} | tar zx`);
renameSync("ecspresso", "/usr/local/bin/ecspresso");

uses: ./.github/actions/install-ecspresso みたいな感じで使う

secretのssh keyを~/.sshに置くやつ

name: write-ssh-key
description: Write ssh key
runs:
  using: node12
  main: index.js
inputs:
  ssh_key:
    description: ssh key
    required: true
  file_name:
    description: file name
    default: id_rsa
    required: true
outputs:
  key_path:
    description: ssh key file path
const { execSync } = require("child_process");
const { mkdirSync, writeFileSync } = require("fs");
const os = require("os");

let file_name = process.env.INPUT_FILE_NAME;
let ssh_key = process.env.INPUT_SSH_KEY;

mkdirSync(`${process.env.HOME}/.ssh`);

writeFileSync(`${process.env.HOME}/.ssh/${file_name}`, ssh_key, {
  mode: 0o600,
});

process.stdout.write(
  `::set-output name=key_path::${process.env.HOME}/.ssh/${file_name}${os.EOL}`
);

stepにidをつけておくと steps.{{ id }}.outputs.key_path のようなかたちでファイルのパスを参照できる。

AWS FargateのECSタスクのコンテナでポートフォワードする

ECS ExecがどうもマネージドなSSM Agentを使って動いているということはわかっていたが、実際どうなっているのかよくわからなかった。

aws ssm start-sessionを実行できそうな雰囲気があるが、--targetに何を渡せばいいのかよくわからなかった。 session-manager-pluginを実行しているようなので、aws ecs execute-commandを実行しつつpsコマンドを実行してみる。

sugawara         80091   0.1  0.1  5441620  17444 s002  S+    4:39PM   0:00.11 session-manager-plugin {"sessionId": "ecs-execute-command-0acebb01a1ed41142", "streamUrl": "wss://ssmmessages.ap-northeast-1.amazonaws.com/v1/data-channel/ecs-execute-command-0acebb01a1ed41142?role=publish_subscribe", "tokenValue": "(省略)"} ap-northeast-1 StartSession  {"Target": "ecs:hello_7412261320c54ef9a1ae606175e9bec1_7412261320c54ef9a1ae606175e9bec1-3811061257"} https://ecs.ap-northeast-1.amazonaws.com

"Target": "ecs:hello_7412261320c54ef9a1ae606175e9bec1_7412261320c54ef9a1ae606175e9bec1-3811061257"

なにこれ?

いろいろ探してみるがドキュメントが見当たらないのでaws cliソースコードを読む。

github.com

def build_ssm_request_paramaters(response, client):
    cluster_name = response['clusterArn'].split('/')[-1]
    task_id = response['taskArn'].split('/')[-1]
    container_name = response['containerName']
    # in order to get container run-time id
    # we need to make a call to describe-tasks
    container_runtime_id = \
        get_container_runtime_id(client, container_name,
                                 task_id, cluster_name)
    target = "ecs:{}_{}_{}".format(cluster_name, task_id,
                                   container_runtime_id)
    ssm_request_params = {"Target": target}
    return ssm_request_params

クラスタ名・タスクID・コンテナIDでTergetを構築しているっぽい。 クラスタ名とタスクIDとコンテナの名前がわかっているなら以下のようにaws ssm start-sessionを実行できる。

~% CLUSTER=hello
~% TASK_ID=7412261320c54ef9a1ae606175e9bec1
~% CONTAINER_NAME=busybox
~% CONTAINER_ID=$(aws ecs describe-tasks --cluster $CLUSTER --task $TASK_ID | jq -r --arg CONTAINER_NAME $CONTAINER_NAME '.tasks[0].containers[] | select(.name == $CONTAINER_NAME).runtimeId')
~% aws ssm start-session --target ecs:${CLUSTER}_${TASK_ID}_${CONTAINER_ID}

Starting session with SessionId: root-06ad4aa7ce3831373
# 

ポートフォワードも可能。

~% aws ssm start-session --target ecs:${CLUSTER}_${TASK_ID}_${CONTAINER_ID} --document-name AWS-StartPortForwardingSession --parameters '{"portNumber":["8080"],"localPortNumber":["18080"]}'

Starting session with SessionId: root-08212759680ea948b
Port 18080 opened for sessionId root-08212759680ea948b.
Waiting for connections...

Connection accepted for session [root-08212759680ea948b]
~% curl localhost:18080
Hello World!

これでコンテナにstoneでも入れておけば、Fargateのタスクを踏み台にしてデータベースなどへのアクセスができる。 ドキュメントがないっぽいのがやや気になるが…