Dockerでrpm/debを作成するサンプルプロジェクトを作ってみた

Docker for Macもstableになったし、Vagrantを立ち上げるのもめんどくさくなってきたので、Dockerでrpmdebを作成するサンプルプロジェクトを作ってみた。

github.com

rpm

OSはCentOS6。

$ make docker:build:centos
docker build -f Dockerfile.centos6 -t docker-pkg-build-centos6 .
...

$ make rpm
docker run --name docker-pkg-build-centos6 -v /Users/sugawara/src/docker-pkg-build:/tmp/src docker-pkg-build-centos6 make -C /tmp/src docker:rpm
...

$ ls pkg/
hello-0.1.0-1.el6.src.rpm       hello-0.1.0-1.el6.x86_64.rpm

deb

OSはUbuntu Trusty.

$ make docker:build:ubuntu
docker build -f Dockerfile.ubuntu-trusty -t docker-pkg-build-ubuntu-trusty .
...

$ make deb
docker run --name docker-pkg-build-ubuntu-trusty -v /Users/sugawara/src/docker-pkg-build:/tmp/src docker-pkg-build-ubuntu-trusty make -C /tmp/src docker:deb
...

$ ls pkg/
hello_0.1.0.dsc         hello_0.1.0_amd64.changes
hello_0.1.0.tar.gz          hello_0.1.0_amd64.deb

tempwork: テンポラリディレクトリでコマンドを実行するコマンド

テンポラリディレクトリを作って、その中で作業して、テンポラリディレクトリを消す…というスクリプトを年間に百回ぐらい書いている気がしたので、うまくラッピングしてくれるtempworkというコマンドを書きました。

github.com

Usage: tempwork command...

tempworkに続いてコマンドを並べると、テンポラリディレクトリを自動的に作成し、そこに移動してからコマンドを実行して、終わったらテンポラリディレクトリを削除します。

$ tempwork bash -c 'pwd; date > tmp.txt; ls ; cat tmp.txt'
# ↓作成されたテンポラリディレクトリ
/private/var/folders/xc/phct0zx57cgc4z07mkt7pp8w0000gp/T/tempwork859985632
tmp.txt # ←テンポラリディレクトリに作成したファイル
Sat Sep  3 18:38:24 JST 2016 # ←ファイルの中身

$ ls /private/var/folders/xc/phct0zx57cgc4z07mkt7pp8w0000gp/T/tempwork859985632
# ↓コマンドが終了したら、テンポラリディレクトリは削除される
ls: /private/var/folders/xc/phct0zx57cgc4z07mkt7pp8w0000gp/T/tempwork859985632: No such file or directory

いままでシェルスクリプトの中でmktemp -dを実行して変数に保存してcdして、コマンドが終了したら削除して…とかやっていたんですが、tempworkを使うとtempwork ./script.shでその辺をいい感じにしてくれます。

$ echo -e '#!/bin/sh\npwd\necho hello' > tmp.sh
$ chmod +x tmp.sh
$ tempwork ./tmp.sh
/private/var/folders/xc/phct0zx57cgc4z07mkt7pp8w0000gp/T/tempwork037699548
hello

どうぞご利用ください。

追記

shebangで使えるようにした。

$ cat ./tmp.sh
#!/usr/bin/tempwork /bin/bash
echo hello
pwd

$ ./tmp.sh
hello
/private/var/folders/xc/phct0zx57cgc4z07mkt7pp8w0000gp/T/tempwork708816166

reloadできるunicorn+railsのDockerイメージ

reloadできるunicorn+railsのDockerイメージを作れそうだったので作ってみた。

以下、登場人物。

Dockerfile

FROM ubuntu:xenial
MAINTAINER Genki Sugawara <sgwr_dts@yahoo.co.jp>

USER root
WORKDIR /

RUN apt-get update
RUN apt-get install -y ruby
RUN apt-get install -y ruby-dev
RUN apt-get install -y build-essential
RUN apt-get install -y zlib1g-dev
RUN apt-get install -y libxml2-dev
RUN apt-get install -y libsqlite3-dev
RUN apt-get install -y nodejs
RUN gem install rails
RUN rails new hello --skip-bundle
RUN sed -i '/puma/d' hello/Gemfile
RUN echo 'gem "unicorn"' >> hello/Gemfile
RUN bundle config --global silence_root_warning 1
RUN cd /hello && bundle
ADD unicorn.conf.rb /hello/config/

ADD init.sh /
RUN chmod +x /init.sh

EXPOSE 8080

CMD ["/init.sh"]

init.sh

#!/bin/bash
RUNNING=1

function unicorn_pid() {
  cat /hello/tmp/pids/unicorn.pid
}

function stop() {
  SIGNAL=$1
  PID=$(unicorn_pid)
  send_signal $SIGNAL

  for i in {1..60}; do
    ps -eo pid | egrep -q "^ +$PID$"
    [ $? -ne 0 ] && break
    echo -n .
    sleep 1
  done

  RUNNING=0
}

function send_signal() {
  SIGNAL=$1
  kill -$SIGNAL $(unicorn_pid)
}

for SIGNAL in $(trap -l | awk -v RS='[\t\n]' '$0 != ""{print $2}'); do
  case $SIGNAL in
    SIGINT | SIGKILL | SIGTERM)
      trap "stop $SIGNAL" $SIGNAL
      ;;
    SIGWINCH)
      ;;
    *)
      trap "send_signal $SIGNAL" $SIGNAL
      ;;
  esac
done

cd /hello
bundle exec unicorn_rails -c config/unicorn.conf.rb -E production -D

while true; do
  if [ $RUNNING -eq 0 ]; then
    break;
  fi

  sleep 1
done

echo unicorn has stopped

unicorn.conf.rb

rails_root = File.expand_path('../..', __FILE__)

worker_processes 4

listen 8080, :tcp_nopush => true

timeout 30

pid "#{rails_root}/tmp/pids/unicorn.pid"

stderr_path "#{rails_root}/log/unicorn.stderr.log"
stdout_path "#{rails_root}/log/unicorn.stdout.log"

preload_app true

check_client_connection false

run_once = true

before_fork do |server, worker|
  defined?(ActiveRecord::Base) and
    ActiveRecord::Base.connection.disconnect!

  if run_once
    run_once = false
  end

  old_pid = "#{server.config[:pid]}.oldbin"
  if old_pid != server.pid
    begin
      sig = (worker.nr + 1) >= server.worker_processes ? :QUIT : :TTOU
      Process.kill(sig, File.read(old_pid).to_i)
    rescue Errno::ENOENT, Errno::ESRCH
    end
  end
end

after_fork do |server, worker|
  defined?(ActiveRecord::Base) and
    ActiveRecord::Base.establish_connection
end

reloadしてみる

まずdocker build

$ docker build -t app .

起動して中身を確認。

$ docker run --name my-app app
$ docker exec my-app ps awxuf
USER       PID %CPU %MEM    VSZ   RSS TTY      STAT START   TIME COMMAND
root       123  0.0  0.1  34424  2872 ?        Rs   18:32   0:00 ps awxuf
root         1  0.1  0.1  18056  2848 ?        Ss   18:31   0:00 /bin/bash /init.sh
root        14  3.9  3.5 195808 72116 ?        Sl   18:31   0:02 unicorn_rails master -c config/unicorn.conf.rb -E production -D
root        17  0.0  3.2 195808 67080 ?        Sl   18:31   0:00  \_ unicorn_rails worker[0] -c config/unicorn.conf.rb -E production -D
root        20  0.0  3.2 195808 67080 ?        Sl   18:31   0:00  \_ unicorn_rails worker[1] -c config/unicorn.conf.rb -E production -D
root        23  0.0  3.2 195808 67016 ?        Sl   18:31   0:00  \_ unicorn_rails worker[2] -c config/unicorn.conf.rb -E production -D
root        26  0.0  3.2 195808 67080 ?        Sl   18:31   0:00  \_ unicorn_rails worker[3] -c config/unicorn.conf.rb -E production -D
root       122  0.0  0.0   4380   708 ?        S    18:32   0:00 sleep 1

masterのpidは14

reloadしてみる。

$ docker kill -s USR2 my-app
my-app
$ docker exec my-app ps awxuf
USER       PID %CPU %MEM    VSZ   RSS TTY      STAT START   TIME COMMAND
root       231  0.0  0.1  34424  2944 ?        Rs   18:33   0:00 ps awxuf
root         1  0.0  0.1  18060  2860 ?        Ss   18:31   0:00 /bin/bash /init.sh
root       182  7.2  3.5 195812 73632 ?        Sl   18:32   0:02 unicorn_rails master -c config/unicorn.conf.rb -E production -D
root       188  0.0  3.3 195812 68044 ?        Sl   18:32   0:00  \_ unicorn_rails worker[0] -c config/unicorn.conf.rb -E production -D
root       191  0.0  3.2 195812 67336 ?        Sl   18:32   0:00  \_ unicorn_rails worker[1] -c config/unicorn.conf.rb -E production -D
root       194  0.0  3.2 195812 67340 ?        Sl   18:32   0:00  \_ unicorn_rails worker[2] -c config/unicorn.conf.rb -E production -D
root       197  0.0  3.2 195812 67344 ?        Sl   18:32   0:00  \_ unicorn_rails worker[3] -c config/unicorn.conf.rb -E production -D
root       230  0.0  0.0   4380   676 ?        S    18:33   0:00 sleep 1

masterのpidは182。 pidが変わっていることを確認。

SIGTERMでgracefulな終了。

$ docker kill -s TERM my-app
$ docker run --name my-app app
.unicorn has stopped

ECS+ALB+hakoでホットデプロイ

ホットデプロイが流行っているらしいので。

github.com

hakoはECS用のデプロイツールで社内ではいろいろと使われています。 ALBと組み合わせて使うと、頑張っている感じのホットデプロイまわりがシンプルになってよいです。

まだ正式にはALBに対応していないのですが、使う方法を後ろの席の人が教えてくれたので、メモしておきます。

2016/09/07 ALBに対応したようです。 https://github.com/eagletmt/hako/pull/11

hakoのインストール

gemでインストール。

gem install hako

EC2インスタンスの準備

とりあえず適当なインスタンスがあればいいのでecs-cliインスタンス群を起動。

ecs-cli configure \
  -r ap-northeast-1 \
  -c hello-hako

ecs-cli up \
  --keypair winebarrel \
  --capability-iam \
  --size 2 \
  --vpc vpc-... \
  --subnets subnet-... \
  --security-group sg-... \
  --instance-type m4.large

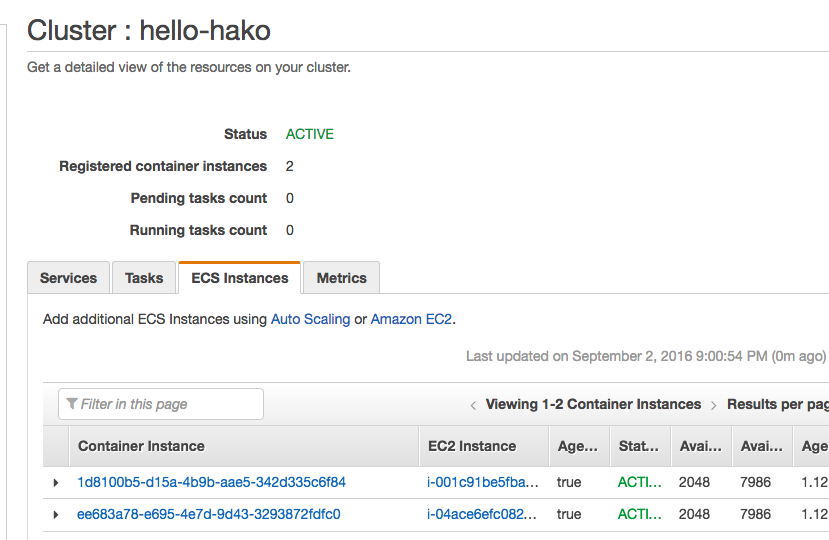
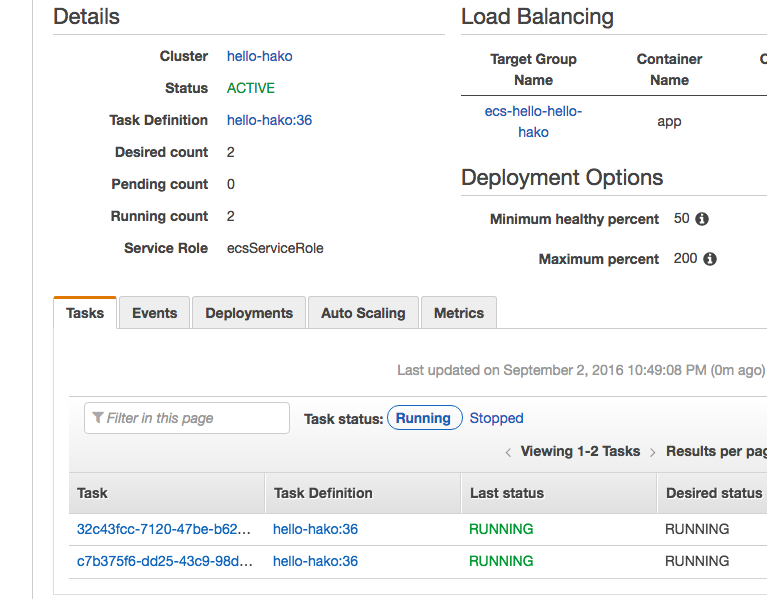
f:id:winebarrel:20160902232008p:plain

f:id:winebarrel:20160902232034p:plain

おけおけ。

タスク定義

以下のようなタスクを定義したyamlを用意。 だいたいはjsonにそのまま対応しているのんですが、微妙に差異があったりなかったり(リファレンス欲しいなぁ)

  • hello-hako.yml(ファイル名がサービス名・タスク名・クラスタ名になる)
scheduler:
  type: ecs
  region: ap-northeast-1
  cluster: hello-hako
  desired_count: 2
app:
  image: nginx
  memory: 300
  cpu: 256
  essential: true
  mount_points:
    - container_path: /usr/share/nginx/html
      source_volume: vol
    - container_path: /var/log/httpd
      source_volume: log
  port_mappings:
    - host_port: 0
      container_port: 80
additional_containers:
  busybox:
    image_tag: busybox
    cpu: 64
    memory: 256
    env:
      MSG: hello
    volumes_from:
      - source_container: app
    # entry_pointはまだ使えないっぽい
    command:
      - /bin/sh
      - -c
      - |
        while true; do
          date >> /usr/share/nginx/html/index.html
          echo $MSG >> /usr/share/nginx/html/index.html
          echo '<br>' >> /usr/share/nginx/html/index.html
          sleep 3
        done
volumes:
  vol: {}
  log:
    source_path: /var/log/httpd

デプロイ

以下のコマンドをたたいて、タスクをデプロイ。

$ hako deploy hello-hako.yml
I, [2016-09-02T22:42:59.125887 #10722]  INFO -- : Registered task definition: arn:aws:ecs:ap-northeast-1:...:task-definition/hello-hako:36
I, [2016-09-02T22:42:59.263683 #10722]  INFO -- : Updated service: arn:aws:ecs:ap-northeast-1:...:service/hello-hako
I, [2016-09-02T22:43:07.825926 #10722]  INFO -- : 2016-09-02 22:43:07 +0900: (service hello-hako) has started 2 tasks: (task adf37618-c758-456b-a35c-cbac2a4a34a4) (task 5b1412d1-ca3d-46d0-8ed8-f3b0fedd3904).
I, [2016-09-02T22:43:13.976431 #10722]  INFO -- : Deployment completed

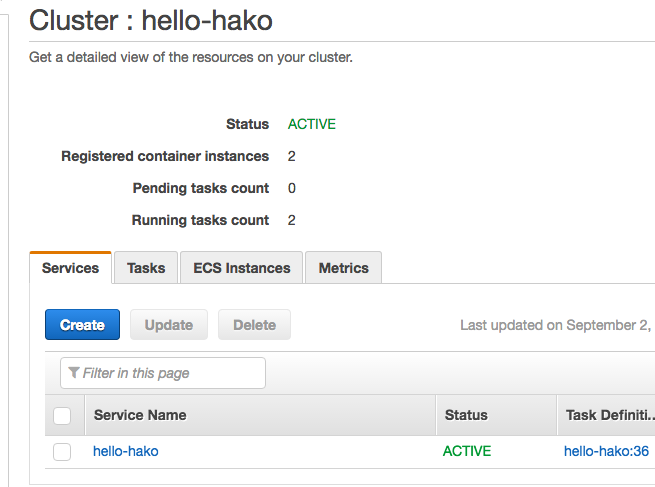
そうするとサービスが作られます。

f:id:winebarrel:20160902232531p:plain

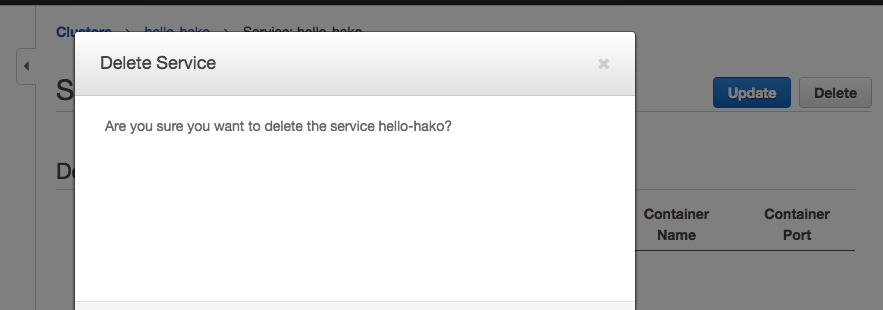
が、これは削除。(事前にNumber of tasks0にする)

f:id:winebarrel:20160902232624p:plain

ALBの作成

次にコマンドラインからALBを作成。

aws elbv2 create-load-balancer --name hello-hako --subnets subnet-xxx subnet-yyy --security-group sg-...

サービスの再作成

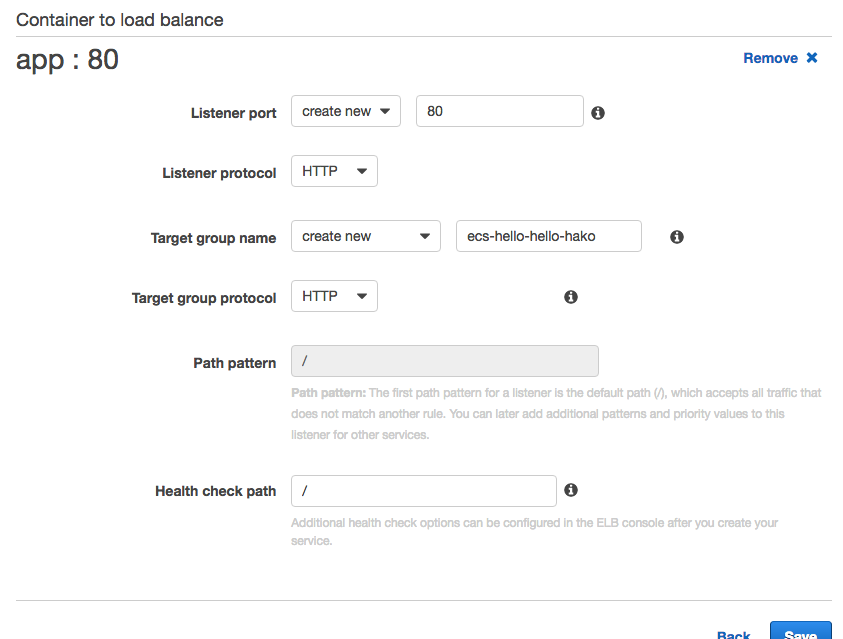
同じ名前でサービスを再作成。 このときにALBの設定もします。

f:id:winebarrel:20160902233046p:plain f:id:winebarrel:20160902233147p:plain f:id:winebarrel:20160902233131p:plain

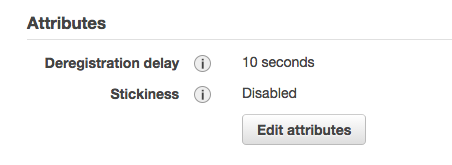
あと、ターゲットグループのDeregistration delayは短めで。 f:id:winebarrel:20160902233230p:plain
で、サービス作成完了。

f:id:winebarrel:20160902233347p:plain

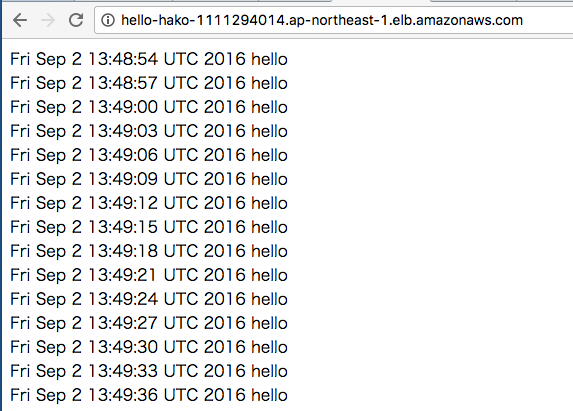
一応、ALBにアクセス。

f:id:winebarrel:20160902233533p:plain

おけおけ。

ホットデプロイ

yamlを以下のように変更してデプロイ。

    command:
      - /bin/sh
      - -c
      - |
        while true; do
          echo modified >> /usr/share/nginx/html/index.html 
          date >> /usr/share/nginx/html/index.html
          echo $MSG >> /usr/share/nginx/html/index.html
          echo '<br>' >> /usr/share/nginx/html/index.html
          sleep 3
        done
$ hako deploy hello-hako.yml
I, [2016-09-02T23:06:55.847629 #16101]  INFO -- : Registered task definition: arn:aws:ecs:ap-northeast-1:...:task-definition/hello-hako:37
...

デプロイと同時にサービスを監視。

$ while true; do echo `date +%X`" | "`curl -s http://hello-hako-1111294014.ap-northeast-1.elb.amazonaws.com/ | head -n 1`; sleep 1; done
230710秒 | Fri Sep 2 14:05:25 UTC 2016
...

しばらく待つとデプロイ完了。

$ hako deploy hello-hako.yml
I, [2016-09-02T23:06:55.847629 #16101]  INFO -- : Registered task definition: arn:aws:ecs:ap-northeast-1:...:task-definition/hello-hako:37
I, [2016-09-02T23:06:56.190146 #16101]  INFO -- : Updated service: arn:aws:ecs:ap-northeast-1:...:service/hello-hako
I, [2016-09-02T23:07:29.817474 #16101]  INFO -- : 2016-09-02 23:07:28 +0900: (service hello-hako) has started 2 tasks: (task c8467e26-c46b-41f7-87b1-f58690fdc1de) (task 058bd7d7-4cfe-4f1b-baf9-46b4d623581a).
I, [2016-09-02T23:07:29.817558 #16101]  INFO -- : 2016-09-02 23:07:28 +0900: (service hello-hako) has begun draining connections on 1 tasks.
I, [2016-09-02T23:07:29.817599 #16101]  INFO -- : 2016-09-02 23:07:28 +0900: (service hello-hako) deregistered 1 targets in (target-group arn:aws:elasticloadbalancing:ap-northeast-1:...:targetgroup/ecs-hello-hello-hako/f1593d29b6a39517)
I, [2016-09-02T23:07:43.310115 #16101]  INFO -- : 2016-09-02 23:07:38 +0900: (service hello-hako) registered 2 targets in (target-group arn:aws:elasticloadbalancing:ap-northeast-1:...:targetgroup/ecs-hello-hello-hako/f1593d29b6a39517)
I, [2016-09-02T23:07:43.310198 #16101]  INFO -- : 2016-09-02 23:07:38 +0900: (service hello-hako) has stopped 1 running tasks: (task a1bb3d3a-ebfa-45dd-8022-907f9c212d49).
I, [2016-09-02T23:07:56.160512 #16101]  INFO -- : 2016-09-02 23:07:51 +0900: (service hello-hako) has begun draining connections on 2 tasks.
I, [2016-09-02T23:07:56.160670 #16101]  INFO -- : 2016-09-02 23:07:51 +0900: (service hello-hako) deregistered 1 targets in (target-group arn:aws:elasticloadbalancing:ap-northeast-1:...:targetgroup/ecs-hello-hello-hako/f1593d29b6a39517)
I, [2016-09-02T23:08:08.035586 #16101]  INFO -- : 2016-09-02 23:08:05 +0900: (service hello-hako) registered 1 targets in (target-group arn:aws:elasticloadbalancing:ap-northeast-1:...:targetgroup/ecs-hello-hello-hako/f1593d29b6a39517)
I, [2016-09-02T23:08:08.035677 #16101]  INFO -- : 2016-09-02 23:08:04 +0900: (service hello-hako) has stopped 1 running tasks: (task 31877197-9498-45be-b345-8f3457e4dd09).
I, [2016-09-02T23:08:18.055483 #16101]  INFO -- : Deployment completed

監視の方は…

23時07分37秒 | Fri Sep 2 14:05:24 UTC 2016
23時07分38秒 | Fri Sep 2 14:05:25 UTC 2016
23時07分39秒 | Fri Sep 2 14:05:25 UTC 2016
23時07分40秒 | Fri Sep 2 14:05:25 UTC 2016
23時07分41秒 | modified
23時07分43秒 | Fri Sep 2 14:05:25 UTC 2016
23時07分44秒 | modified
23時07分45秒 | modified
23時07分46秒 | Fri Sep 2 14:05:25 UTC 2016
23時07分47秒 | modified
23時07分48秒 | modified
23時07分49秒 | Fri Sep 2 14:05:25 UTC 2016
23時07分50秒 | modified
23時07分51秒 | modified
23時07分52秒 | Fri Sep 2 14:05:25 UTC 2016
23時07分54秒 | modified
23時07分55秒 | modified
23時07分56秒 | Fri Sep 2 14:05:25 UTC 2016
23時07分57秒 | modified
23時07分58秒 | modified
23時07分59秒 | Fri Sep 2 14:05:25 UTC 2016
23時08分00秒 | modified
23時08分01秒 | modified
23時08分02秒 | Fri Sep 2 14:05:25 UTC 2016
23時08分03秒 | modified
23時08分04秒 | modified
23時08分06秒 | modified
23時08分07秒 | modified

おけおけ。 ダウンタイムないですね。

DynamoDBとGoogleスプレッドシートを相互同期するやつ

confdのDynamoDBをGoogleスプレッドシートで管理したかったので作りました。

docs.google.com

使い方

まず、以下のようにDynamoDBのテーブルを作ります。(confdのと同じ

aws dynamodb create-table \
    --region ap-northeast-1 --table-name hello \
    --attribute-definitions AttributeName=key,AttributeType=S \
    --key-schema AttributeName=key,KeyType=HASH \
    --provisioned-throughput ReadCapacityUnits=1,WriteCapacityUnits=1

ついでにddbcliを使ってテーブルにデータを入れておきます。

$ ddbcli
ap-northeast-1> insert into hello (key, value) values ('foo', 'bar');
// 1 row changed (0.29 sec)

ap-northeast-1> select all * from hello;
[
  {"key":"foo","value":"bar"}
]
// 1 row in set (0.07 sec)

したらば上記のスプレッドシートをコピーします。

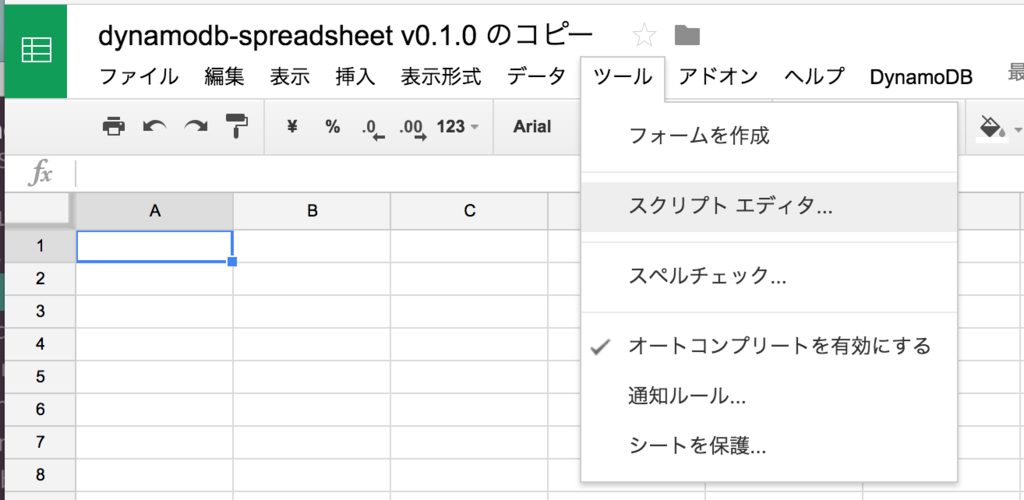
コピーしたらスクリプトエディタを開きます。

f:id:winebarrel:20160901213655p:plain

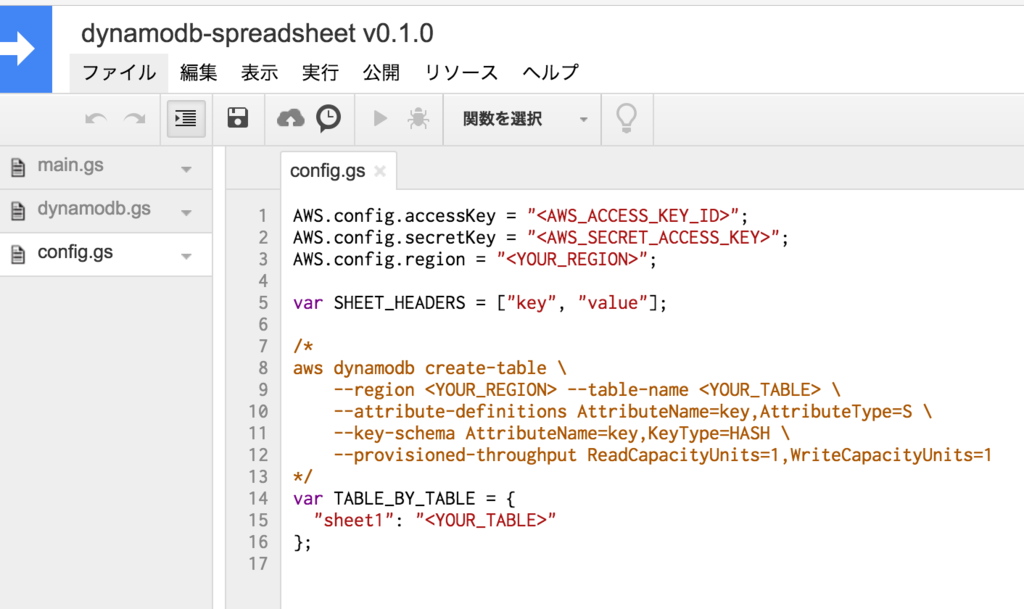
config.gsというスクリプトがあるので、それを適当に編集します。

f:id:winebarrel:20160901213835p:plain

メニューからDynamoDBLoad from DynamoDBを選択すると、DynamoDBからスプレッドシートにデータが読み込まれます。

f:id:winebarrel:20160901214114p:plain

スプレッドシートを適当に編集して、DynamoDBSave to DynamoDBを選択すると、データがDynamoDBに保存されます。

f:id:winebarrel:20160901214244p:plain

$ ddbcli
ap-northeast-1> select all * from hello;
[
  {"key":"zoo","value":"baz"},
  {"key":"foo","value":"BAR"}
]
// 2 rows in set (0.05 sec)

参考にしたりフォークしたりしたやつ

適当なECSデプロイスクリプト

JSONYAMLプリプロセス出来ると、なおうれし。

{
  "containerDefinitions": [
    {
      "volumesFrom": [],
      "memory": 300,
      "portMappings": [
        {
          "hostPort": 0,
          "containerPort": 80,
          "protocol": "tcp"
        }
      ],
      "essential": true,
      "mountPoints": [
        {
          "containerPath": "/usr/local/apache2/htdocs",
          "sourceVolume": "vol"
        },
        {
          "containerPath": "/var/log/httpd",
          "sourceVolume": "log"
        }
      ],
      "name": "httpd",
      "environment": [],
      "image": "httpd:2.4",
      "cpu": 10
    },
    {
      "volumesFrom": [
        {
          "sourceContainer": "httpd"
        }
      ],
      "memory": 200,
      "portMappings": [],
      "essential": true,
      "entryPoint": [
        "sh",
        "-c"
      ],
      "mountPoints": [],
      "name": "testapp",
      "environment": [],
      "image": "busybox",
      "command": [
        "/bin/sh -c 'while true; do echo xxx >> /usr/local/apache2/htdocs/index.html; sleep 3; done'"
      ],
      "cpu": 10
    }
  ],
  "volumes": [
    {
      "name": "vol"
    },
    {
      "host": {
        "sourcePath": "/var/log/httpd"
      },
      "name": "log"
    }
  ],
  "family": "test"
}
  • ec-deploy.sh
#!/bin/bash
set -e

if [ -z "$1" -o -z "$2" ]; then
  echo "usage: $0 SERVICE TASK_JSON"
  exit
fi

SERVICE=$1
TASK_JSON=$2
TASK_NAME=$(jq -r .family $TASK_JSON)
TASK_ROLE=arn:aws:iam::...:role/...

function get_last_event() {
  EVENT=$(aws ecs describe-services --services $1 | jq -r '.services[0].events[0] | [.id, .message] | @tsv')
  EVENT_ID=$(awk -F '\t' '{print $1}' <<< "$EVENT")
  EVENT_MSG=$(awk -F '\t' '{print $2}' <<< "$EVENT")
}

get_last_event $SERVICE
LAST_EVENT_ID="$EVENT_ID"
LAST_EVENT_MSG="$EVENT_MSG"

aws ecs register-task-definition \
  --task-role-arn=$TASK_ROLE \
  --cli-input-json file://$TASK_JSON > /dev/null

aws ecs update-service --service $SERVICE --task-definition $TASK_NAME > /dev/null

while true; do
  get_last_event $SERVICE

  if [ "$EVENT_ID" != "$LAST_EVENT_ID" ]; then
    echo $EVENT_MSG

    if [[ "$EVENT_MSG" =~ has\ reached\ a\ steady\ state ]]; then
      break
    fi

    LAST_EVENT_ID="$EVENT_ID"
    LAST_EVENT_MSG="$EVENT_MSG"
  fi
done

デプロイ例

$  ecs-deploy.sh hello task.json
(service hello) has started 1 tasks: (task 2b3ab535-05f7-40be-a2a7-b661e56e9527).
(service hello) registered 1 targets in (target-group arn:aws:elasticloadbalancing:ap-northeast-1:...:targetgroup/default/afb88bc90fe30b1a)
(service hello) has begun draining connections on 1 tasks.
(service hello) has stopped 1 running tasks: (task 9cc4b054-0fa5-4083-a23d-e3a497400bd5).
(service hello) has reached a steady state.

graceful restart可能なHAProxyのDockerイメージ

ふつうに作れそうだったので作ってみた。 以下、関連ファイル。

  • Dockerfile
FROM ubuntu:latest
MAINTAINER Genki Sugawara <sgwr_dts@yahoo.co.jp>

RUN apt-get update
RUN apt-get install -y haproxy

ADD haproxy.cfg /

ADD supervisor.sh /
RUN chmod +x /supervisor.sh

CMD ["/supervisor.sh"]
  • supervisor.sh
#!/bin/bash
RELOAD=0

function set_reload() {
  RELOAD=1
}

trap set_reload USR1

haproxy -f /haproxy.cfg &

while true; do
  if [ $RELOAD -eq 1 ]; then
    haproxy -f /haproxy.cfg -sf `ps -o pid,command | awk '$2 == "haproxy" {print $1}'` &
    RELOAD=0
  fi

  sleep 1
done
  • haproxy.cfg
defaults
  timeout connect 5000ms
  timeout client 50000ms
  timeout server 50000ms

listen example
  mode http
  bind :80
  server example.com example.com:80

これをdocker build

$ docker build -t haproxy .
Sending build context to Docker daemon 4.096 kB
Step 1 : FROM ubuntu:latest
 ---> 3876b81b5a81
Step 2 : MAINTAINER Genki Sugawara <sgwr_dts@yahoo.co.jp>
 ---> Using cache
 ---> 249acbf0fe6a
Step 3 : RUN apt-get update
 ---> Using cache
 ---> f2e5cbbb164f
Step 4 : RUN apt-get install -y haproxy
 ---> Using cache
 ---> 3f518b918618
Step 5 : ADD haproxy.cfg /
 ---> Using cache
 ---> bf5df2e90b51
Step 6 : ADD supervisor.sh /
 ---> Using cache
 ---> 98ae226f35b8
Step 7 : RUN chmod +x /supervisor.sh
 ---> Using cache
 ---> 1ae6d30dca44
Step 8 : CMD /supervisor.sh
 ---> Using cache
 ---> eaae080bd487
Successfully built eaae080bd487

で、docker run

$ docker run -p 10080:80 --name haproxy haproxy
$ curl localhost:10080
<?xml version="1.0" encoding="iso-8859-1"?>
<!DOCTYPE html PUBLIC "-//W3C//DTD XHTML 1.0 Transitional//EN"
         "http://www.w3.org/TR/xhtml1/DTD/xhtml1-transitional.dtd">
<html xmlns="http://www.w3.org/1999/xhtml" xml:lang="en" lang="en">
        <head>
            <title>404 - Not Found</title>
        </head>
        <body>
            <h1>404 - Not Found</h1>
        </body>
</html>

docker execでUSR1を投げる。

$  docker exec haproxy kill -USR1 1

するとgraceful restartされる

[WARNING] 241/130328 (6) : Stopping proxy example in 0 ms.
[WARNING] 241/130328 (6) : Proxy example stopped (FE: 1 conns, BE: 1 conns).
$ curl localhost:10080
<?xml version="1.0" encoding="iso-8859-1"?>
<!DOCTYPE html PUBLIC "-//W3C//DTD XHTML 1.0 Transitional//EN"
         "http://www.w3.org/TR/xhtml1/DTD/xhtml1-transitional.dtd">
<html xmlns="http://www.w3.org/1999/xhtml" xml:lang="en" lang="en">
        <head>
            <title>404 - Not Found</title>
        </head>
        <body>
            <h1>404 - Not Found</h1>
        </body>
</html>

おけおけ。

他のシグナルのこととか、そのままではプロダクションには使えないけど、同じ戦略でいけそう。