https://chromewebstore.google.com/detail/github-hide-finish-commen/ejflccgjhcloeienodjdmngdhockjbdf
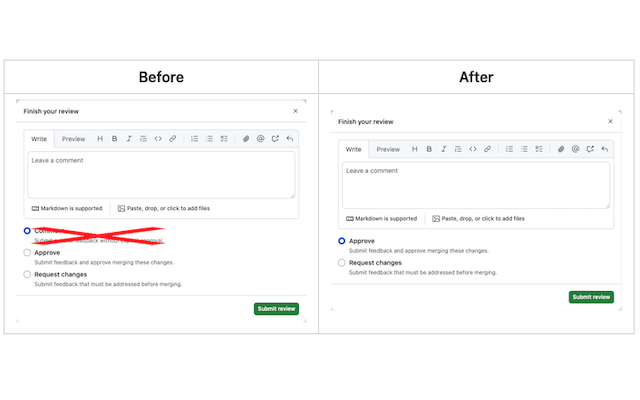
10回に1回ぐらい「Approveしたと思ったらCommentだった」ということがあるので、Finish your reviewからCommentを消す拡張を作ってみた。

https://chromewebstore.google.com/detail/github-hide-finish-commen/ejflccgjhcloeienodjdmngdhockjbdf
10回に1回ぐらい「Approveしたと思ったらCommentだった」ということがあるので、Finish your reviewからCommentを消す拡張を作ってみた。

本体は ERB.new().result を呼ぶだけで、それをmrubyでdarwin/linuxのx86_64/aarch64向けにビルドした。
以下のようにシングルバイナリプログラムを通してテンプレートファイルを処理できる。
<%-
to = ENV["MAIL_TO"]
priorities = ENV["PRIORITIES"].split(",").map(&:strip)
-%>
From:  James <james@example.com>
To:  <%= to %>
Subject:  Addressing Needs

<%= to[/\w+/] %>:

Just wanted to send a quick note assuring that your needs are being
addressed.

I want you to know that my team will keep working on the issues,
especially:

<%# ignore numerous minor requests -- focus on priorities %>
<%- priorities.each do |priority| -%>
* <%= priority %>
<%- end -%>

Thanks for your patience.

James
$ export MAIL_TO="Community Spokesman <spokesman@example.com>"
$ export PRIORITIES="Run Ruby Quiz,Document Modules,Answer Questions on Ruby Talk"

$ minierb mail.erb
From:  James <james@example.com>
To:  Community Spokesman <spokesman@example.com>
Subject:  Addressing Needs

Community:

Just wanted to send a quick note assuring that your needs are being
addressed.

I want you to know that my team will keep working on the issues,
especially:


* Run Ruby Quiz
* Document Modules
* Answer Questions on Ruby Talk

Thanks for your patience.

James
Dockerコンテナを動かすときに設定値の注入のため環境変数経由で設定ファイルを書き換えることがよくある。 sedで頑張っているDockerイメージもあるし、Docker社の提供するnginxイメージだと組み込みでenvsubstがついてくる。
しかし、単純にプレースホルダを環境変数で置換するだけだと、全然機能が足りないと思っていて、条件分岐や繰り返し、デフォルト値の設定が欲しくなる。 Rubyには組み込みでERBが含まれているが、nginxなどのコンテナにRubyランタイム一式をインストールはしたくない。 そうすると選択肢が限られてきて、自分はGoのテンプレートが使えるsigilを使うことが多かった。
Goのテンプレートは個人的には結構好きだが、パイプラインのような書き方を好まない人もいそうだなとか、もう少しだけテキスト処理を便利にしてほしいなどのニーズがありそうだな…ということで、minierbを作ってみた。
他のエンジニアがDocker向けにどのようなテンプレートプロセッサーを利用しているのか、とても気になる。
terraformでaws_lambda_functionとarchive_fileを使ってLambdaをデプロイする方法がある。
data "archive_file" "lambda" {
  type        = "zip"
  source_file = "lambda.js"
  output_path = "lambda_function_payload.zip"
}

resource "aws_lambda_function" "test_lambda" {
  filename         = data.archive_file.data.archive_file.nyan.output_path.output_path
  function_name    = "lambda_function_name"
  role             = aws_iam_role.iam_for_lambda.arn
  handler          = "index.handler"
  source_code_hash = data.archive_file.lambda.output_base64sha256
  runtime          = "nodejs18.x"
}
しかし、node_modulesと相性が悪くて、npm iの実行タイミングが難しかったり、terraformのCIで毎回差分が出たりする。
リソースの方のarchive_fileとnull_resourceを組み合わせれば出来るかもしれないが、archive_file (Resource)はすでに非推奨で、やり方を考えるのにも手間がかかる。
なのでzipファイルのハッシュ値はtfstateに保持しつつ、ソースコードやpackage.jsonが変わったらnpm iとzipファイルの再作成を行うterraform providerを作った。
以下のようなファイル構成だったとして
./
|-- lambda/
|   |-- index.js
|   |-- node_modules/
|   |-- package-lock.json
|   `-- package.json
`-- main.tf
main.tfは次のようになる。
terraform {
  required_providers {
    lambdazip = {
      source  = "winebarrel/lambdazip"
      version = ">= 0.5.0"
    }
  }
}

data "lambdazip_files_sha256" "triggers" {
  files = ["lambda/*.js", "lambda/*.json"]
}

resource "lambdazip_file" "app" {
  base_dir      = "lambda"
  sources       = ["**"]
  excludes      = [".env"]
  output        = "lambda.zip"
  before_create = "npm i"
  triggers      = data.lambdazip_files_sha256.triggers.map
}

resource "aws_lambda_function" "app" {
  filename         = lambdazip_file.app.output
  function_name    = "my_func"
  role             = aws_iam_role.lambda_app_role.arn
  handler          = "index.handler"
  source_code_hash = lambdazip_file.app.base64sha256
  runtime          = "nodejs20.x"
}

resource "aws_iam_role" "lambda_app_role" {
  name = "lambda-app-role"

  assume_role_policy = jsonencode({
    Version = "2012-10-17"
    Statement = [
      {
        Effect    = "Allow"
        Principal = { Service = "lambda.amazonaws.com" }
        Action    = "sts:AssumeRole"
      }
    ]
  })
}

resource "aws_iam_role_policy_attachment" "lambda_app_role" {
  role       = aws_iam_role.lambda_app_role.name
  policy_arn = "arn:aws:iam::aws:policy/service-role/AWSLambdaBasicExecutionRole"
}
npm iが実行されてからzipファイルが作成されるGoをLambdaにデプロイする場合は、archive_fileとnull_resourceだけで出来るかもしれないが、lambdazipを使うとよりシンプルにかけると思う。
./
|-- lambda/
|   |-- go.mod
|   |-- go.sum
|   `-- main.go
`-- main.tf
data "lambdazip_files_sha256" "triggers" {
  files = ["lambda/*.go", "lambda/go.mod", "lambda/go.sum"]
}

resource "lambdazip_file" "app" {
  base_dir      = "lambda"
  sources       = ["bootstrap"]
  output        = "lambda.zip"
  before_create = "GOOS=linux GOARCH=amd64 go build -o bootstrap main.go"
  triggers      = data.lambdazip_files_sha256.triggers.map
}

resource "aws_lambda_function" "app" {
  filename         = lambdazip_file.app.output
  function_name    = "my_func"
  role             = aws_iam_role.lambda_app_role.arn
  handler          = "my-handler"
  source_code_hash = lambdazip_file.app.base64sha256
  runtime          = "provided.al2023"
}
cf. アプリケーションを取得する - Microsoft Graph v1.0 | Microsoft Learn
#!/usr/bin/env python
# pip install azure-identity msgraph-sdk
import asyncio
import pprint
from azure.identity.aio import ClientSecretCredential
from msgraph import GraphServiceClient

client_id = "..."
tenant_id = "..."
client_secret = "..."

credentials = ClientSecretCredential(
    tenant_id=tenant_id, client_id=client_id, client_secret=client_secret
)
scopes = ["https://graph.microsoft.com/.default"]
client = GraphServiceClient(credentials=credentials, scopes=scopes)


async def print_app():
    apps = await client.applications.get()
    for app in apps.value:
        pprint.pprint(app.display_name)


asyncio.run(print_app())
{
  search(type: ISSUE, last: 100, query: "is:open is:pr author:@me org:qubole") {
    nodes {
      ... on PullRequest {
        title
        url
        reviewDecision
        commits(last: 1) {
          nodes {
            commit {
              statusCheckRollup {
                state
              }
            }
          }
        }
      }
    }
  }
}
{
  "data": {
    "search": {
      "nodes": [
        {
          "title": "Fix or skip deepsource check in commands.py",
          "url": "https://github.com/qubole/qds-sdk-py/pull/341",
          "reviewDecision": "REVIEW_REQUIRED",
          "commits": {
            "nodes": [
              {
                "commit": {
                  "statusCheckRollup": {
                    "state": "SUCCESS"
                  }
                }
              }
            ]
          }
        }
      ]
    }
  }
}
cf.
GitHub - winebarrel/swift-octokit-cli-example
// let package = Package(
//     name: "octokit-cli",
//     platforms: [
//         .macOS(.v14),
//     ],

import Foundation
import OctoKit

let env = ProcessInfo.processInfo.environment
let token = env["GITHUB_TOKEN"]!
let config = TokenConfiguration(token)

let octokit = Octokit(config)
let user = try! await octokit.me()
print(user.name!)

// async未対応の場合
let ns = try! await withCheckedThrowingContinuation { continuation in
    octokit.myNotifications { response in
        switch response {
        case let .success(notifications):
            continuation.resume(returning: notifications)
        case let .failure(error):
            continuation.resume(throwing: error)
        }
    }
}

for n in ns {
    print(n.subject.title!)
}